How Does a Vinyl Cutter Work: Quick Guide
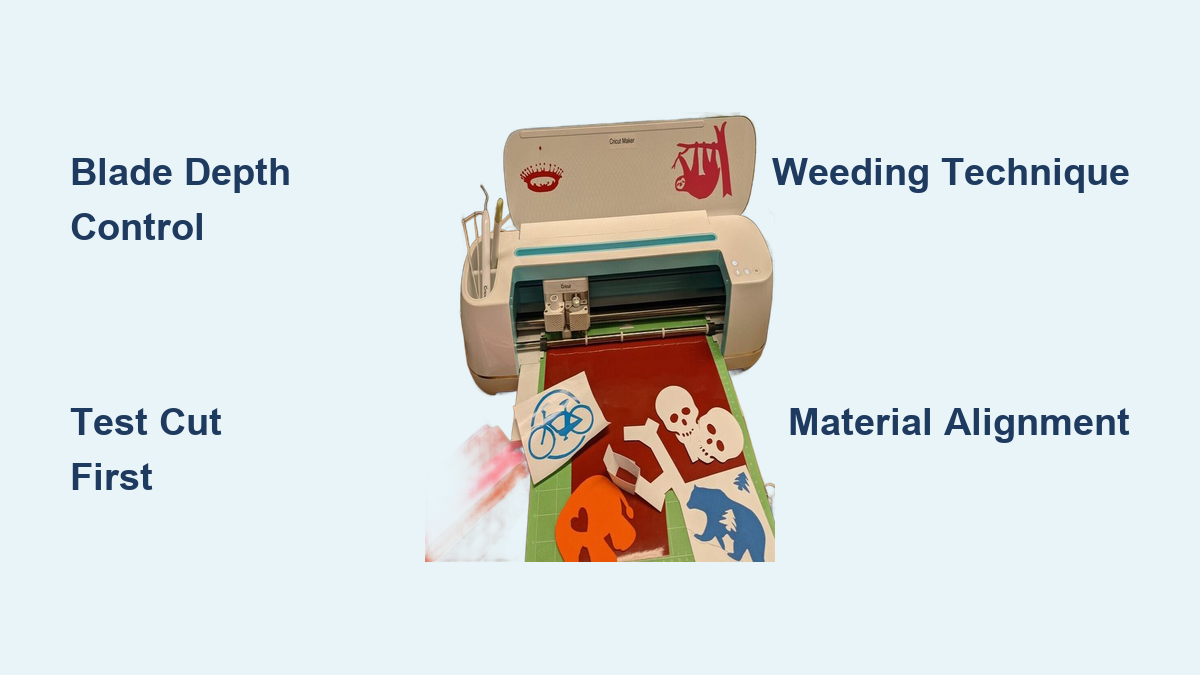
Ever wondered how those crisp car decals, custom t-shirt designs, and professional storefront signs get made with such precision? The answer lies in a specialized machine that transforms digital artwork into physical graphics. How does a vinyl cutter work? It uses a computer-controlled blade to trace vector-based designs through adhesive vinyl, creating clean shapes while leaving the backing paper intact for later application.
This subtractive process stands apart from printing because it removes material rather than adding ink. The result is durable, weather-resistant graphics perfect for everything from DIY crafts to commercial signage. In this guide, you’ll learn the inner mechanics, the workflow from design to application, the different machine types available, and practical tips to get professional results on your very first project.
The Core Cutting Mechanism Behind Vinyl Cutters
Coordinated Motion Between Blade and Material
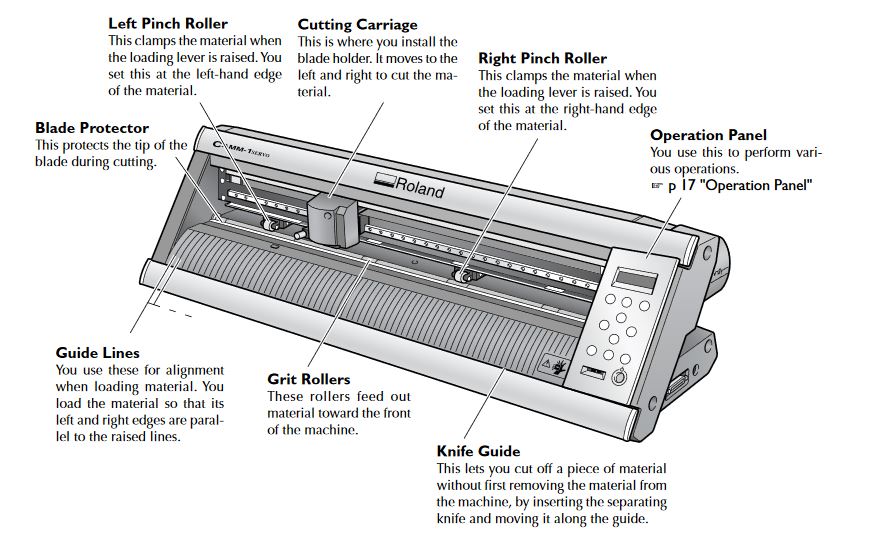
A vinyl cutter relies on two synchronized movements working together to trace precise paths. The cutting carriage slides left and right across a guide rail while pinch rollers grip the vinyl and feed it forward or backward. This dual-axis control lets the blade follow complex curves and sharp angles with remarkable accuracy.
Think of it like a robotic pen drawing on paper, except the pen leaves a sliced line instead of ink. The computer sends exact coordinate data to the machine, directing every movement. Between cuts, the blade stays lowered to save time, which may leave light drag marks on the vinyl surface. These marks are completely normal and do not affect the final product.
Subtractive Manufacturing Approach
Vinyl cutting removes material to form shapes, which means you can only cut colors that already exist on the vinyl roll. Each color in a multi-color design requires a separate piece of pre-colored vinyl, cut individually and layered during application. This limitation shapes the entire workflow because designers must separate artwork into individual cutting layers.
The advantage is exceptional durability. Vinyl resists weather, UV rays, and wear, making it ideal for outdoor signs and vehicle graphics. Unlike printed images that can fade, cut vinyl maintains its color integrity for years when properly applied.
Blade Depth and Pressure Control
Setting the correct blade depth is critical for clean cuts. The blade must slice through the vinyl layer completely without cutting into the release liner (backing paper). Too shallow produces incomplete cuts that won’t weed properly. Too deep damages the backing and makes weeding difficult.
Most machines feature a manual adjustment dial on the blade holder. Thicker materials like heat-transfer vinyl require deeper penetration, while standard adhesive vinyl needs only a light touch. Advanced models automatically detect material type and adjust settings accordingly.
Key Hardware Components Inside a Vinyl Cutter
Cutting Carriage and Blade Assembly
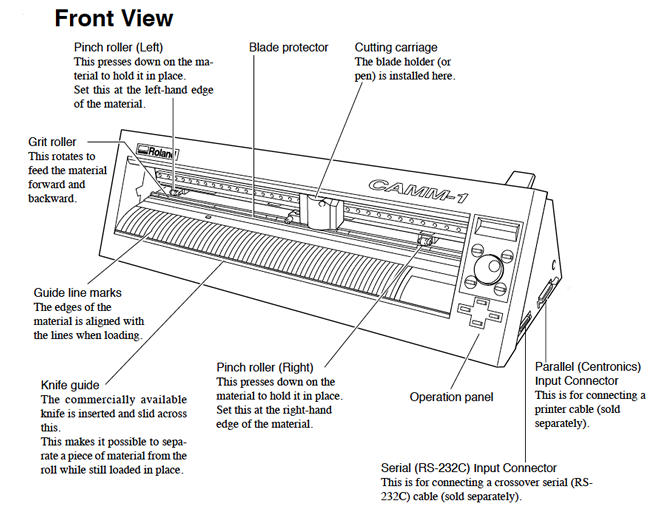
The cutting carriage houses the blade and slides along a horizontal rail. It contains a spring-loaded blade that pivots slightly to navigate curves smoothly. Blades are replaceable consumables that come in several varieties:
- Standard blades for regular adhesive vinyl
- Heavy-duty blades for thick heat-transfer vinyl or cardstock
- Rotary blades for fabric and mesh materials
Blade lifespan depends on usage intensity. With heavy daily use, blades last a few weeks. Casual hobbyists may get several months from a single blade. Dull blades cause jagged edges and incomplete cuts, so regular inspection is essential.
Pinch Rollers and Material Feed System
Pinch rollers at the front and rear of the machine grip the vinyl and control its movement through the cutter. Proper alignment matters because skewed material produces crooked designs. Most machines include adjustable roller bars that accommodate different vinyl widths.
Some cutters feature edge sensors that auto-align the starting position. High-end models use servo motors for smoother, more precise feeding, which becomes especially important for large-format projects like banners and vehicle wraps.
Control Panel and Connectivity Options
The control panel lets users manually feed or reverse vinyl, release rollers, and toggle between online and offline modes. Basic models require constant computer connection, while standalone cutters have built-in memory and LCD screens for simple jobs.
Modern machines connect primarily through USB ports. Older industrial units may use serial connections. Driver installation is often required, particularly on Windows systems. Mac users should verify software compatibility before purchasing, as some programs offer better Mac support than others.
From Digital Design to Physical Cut: The Workflow
Creating Vector Artwork
Vinyl cutters cannot interpret pixel-based images like JPEGs or PNGs. They require vector paths, which are mathematical lines and curves that define shapes with perfect scalability. You create these using vector design software such as:
- Adobe Illustrator
- CorelDRAW
- Inkscape (free and open source)
Supported file formats include SVG, EPS, PDF, AI, and DXF. If you start with a raster image, you must vectorize it first using tools like Inkscape’s trace function or Vector Magic. Always convert text to outlines before exporting to ensure fonts display correctly on any computer.
Using Cutting Software
Cutting software acts as the bridge between your design file and the machine. Popular options include Flexi Starter 10, SignCut, Silhouette Studio, and Cricut Design Space. This software allows you to:
- Resize and rotate designs
- Arrange multiple copies for efficient material use
- Add weeding lines or frames for easier processing
- Set cut order and direction
- Define cut parameters like speed, pressure, and passes
Simple shapes on thin vinyl need less force and fewer passes. Thick heat-transfer vinyl often requires multiple passes to cut completely through.
Performing a Test Cut
Never skip the test cut. Start with a small letter or simple shape using low pressure. After cutting, check whether the blade penetrated the vinyl fully while leaving only a light score on the backing paper. Corners should be sharp rather than rounded.
If the cut is incomplete, increase pressure incrementally and try again. A perfect test cut feels clean during weeding with no tearing or lifting of the liner. This 30-second step saves minutes of rework and prevents wasted material.
Types of Vinyl Cutters and How They Differ

Standalone vs. Computer-Controlled Models
| Feature | Standalone Cutter | Computer-Controlled |
|---|---|---|
| Design Source | Built-in templates | Any vector file |
| Flexibility | Limited | Full creative control |
| Best For | Simple crafts and lettering | Custom logos and complex art |
| Price Range | $100 to $300 | $300 to $3,000+ |
Standalone machines work well for beginners making greeting cards or basic stencils. Computer-controlled cutters offer unlimited design potential through software integration and suit professionals who need precise custom output.
Standard vs. Print-and-Cut Machines
| Feature | Standard Cutter | Print-and-Cut Machine |
|---|---|---|
| Function | Cuts pre-colored vinyl | Prints then cuts around image |
| Color Range | Limited to vinyl colors | Full CMYK+ color printing |
| Workflow | Simpler setup | Requires print alignment |
| Ideal Use | Solid-color signs and HTV | Photorealistic stickers |
Print-and-cut machines combine an inkjet printer with a cutting plotter. They first print a design, then use registration marks to align and cut precisely around the printed image. These units excel at custom stickers with gradients but require more maintenance and cost more upfront.
Desktop vs. Wide-Format Cutters
Desktop cutters range from 12 to 24 inches wide and suit home use, small decals, and craft projects. Wide-format cutters exceed 60 inches and handle vehicle wraps, banners, and large signage. For most small businesses, a 24-inch cutter provides the best balance between capability and workspace requirements.
Step-by-Step Process for Running a Vinyl Cut
Loading and Aligning the Material
- Unroll a section of vinyl and lay it flat without wrinkles.
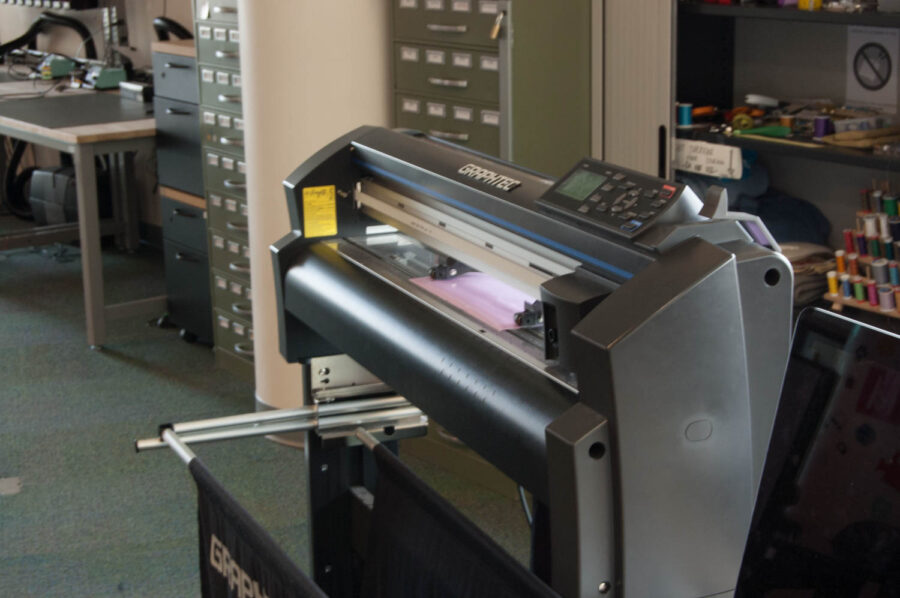
- Feed it under the front pinch rollers and over the rear roller bar.
- Pull gently until taut, aligning the edge with the roller marks.
- Press the roller release lever to clamp the material securely.
- Use provided clamps or tape to secure any loose ends.
Misalignment causes skewed cuts, so take time to get this step right.
Setting Blade and Cut Parameters
- Adjust the blade depth dial to match your vinyl thickness.
- In software, select the material type or manually configure:
– Cut speed: Faster for thin vinyl, slower for thick materials
– Pressure: Start low and increase after test cuts
– Passes: One for standard vinyl, two to three for heat-transfer vinyl - Choose cut order based on your design complexity.
Starting the Cutting Job
- Click the cut command in your software.
- The machine feeds vinyl to the starting position automatically.
- The blade lowers and begins tracing the design path.
- Watch for jams or unusual sounds but never touch moving parts.
Cut time varies dramatically. A simple logo takes about 30 seconds, while a full vehicle wrap may require several hours to complete.
Weeding and Applying Your Cut Design
Removing Excess Vinyl
Weeding means peeling away unwanted vinyl from around and inside your design. Essential tools include:
- Weeding picks for small details
- Tweezers for lifting corners
- Hook tools for curved areas
- Scalpels for precision cuts
Work under good lighting. A magnifying lamp helps with intricate details. If parts won’t lift easily, the cut is probably too shallow and needs higher pressure.
Applying Transfer Tape
Once weeded, apply transfer tape over your design:
- Cut a piece slightly larger than the design.
- Peel the liner and smooth the tape over the vinyl.
- Use a squeegee with a felt sleeve to rub firmly and activate the adhesive.
- Slowly peel back the tape. The vinyl should stick to it, not the liner.
For wide designs, overlap tape strips by about a quarter inch to prevent gaps.
Installing the Design
- Clean the target surface with rubbing alcohol to remove oils and dirt.
- Optionally spray application fluid for repositionable installation.
- Position the transfer tape and press one edge down first.
- Squeegee outward to remove bubbles and ensure adhesion.
- Wait 10 to 30 minutes for liquid to evaporate if used.
- Peel off the transfer tape at a sharp angle between 45 and 90 degrees.
If the vinyl lifts during removal, the surface wasn’t clean enough or the tape lacks sufficient tack.
Materials a Vinyl Cutter Can Handle
Common Vinyl Types
- Adhesive vinyl for decals, labels, and signs (indoor and outdoor)
- Heat-transfer vinyl for t-shirts, hoodies, and bags applied with a heat press
- Frosted vinyl for window graphics and privacy film
- Reflective vinyl for safety signs and vehicle markings
- Glitter and metallic vinyl for decorative crafts and fashion items
Each type has different thickness and adhesive properties, requiring blade setting adjustments.
Specialty and Thick Materials
Professional-grade cutters handle more demanding materials:
- Sandblast stencils made from thick mylar for etching glass or stone
- Cardstock for paper crafts and layered art projects
- Thermal paper for label making
- Thin wood or leather with high-pressure models
These substrates require stronger blades and slower cutting speeds to maintain clean edges.
Maintenance Tips for Long-Term Accuracy
Cleaning Rollers and Blades
Dust and adhesive residue accumulate on pinch rollers, causing slippage and misfeeds. Wipe them weekly with a soft cloth dampened with water or isopropyl alcohol. Blades collect vinyl dust and residue that affects cut quality. Clean blades regularly and replace them every few weeks under heavy use.
Performing Regular Calibration
Mechanical wear leads to misalignment over time, especially in print-and-cut machines. Run a calibration test every few weeks:
- Print a test pattern with registration marks.
- Load the pattern into the cutter.
- Let the machine scan and adjust alignment automatically.
Even standard cutters benefit from manual checks. Cut a square and measure both diagonals. They should be exactly equal.
Tracking Maintenance Activities
Keep a simple log recording:
- Blade changes
- Roller cleaning dates
- Calibration results
- Software updates
Proper maintenance can reduce downtime by up to 20 percent. Neglecting upkeep accounts for nearly 30 percent of printer-cutter issues according to industry data.
Troubleshooting Common Vinyl Cutter Problems
Incomplete Cuts
Symptoms: Vinyl doesn’t separate fully and parts remain connected.
Fix:
– Increase blade pressure or depth incrementally
– Replace the dull blade
– Slow down cut speed for better penetration
– Run another test cut to verify settings
Cutting Through Backing
Symptoms: Backing paper gets sliced or torn during weeding.
Fix:
– Reduce blade depth
– Lower pressure settings
– Install a sharper blade (dull blades require more force)
Material Jams
Symptoms: Vinyl gets stuck or feeds unevenly through the machine.
Fix:
– Turn off the machine before clearing material
– Check for obstructions in the feed path
– Ensure rollers are clean and properly aligned
– Avoid loose vinyl ends flapping near the feed area
Software Connection Failures
Symptoms: Computer doesn’t recognize the cutter.
Fix:
– Reinstall device drivers
– Try a different USB cable or port
– Verify the cutter is set to online mode
– Restart both computer and machine
Pro Tips and Real-World Applications
Professional Tips for Better Results
Always do a test cut before running full jobs. New vinyl batches vary in thickness, and settings from previous sessions may not apply. Design with weeding in mind by avoiding tiny isolated pieces. Use weeding bridges or breakaway lines to keep small elements attached until application.
Invest in quality materials from reputable brands. Cheap vinyl peels, fades, and tears easily. OEM blades last longer than generic alternatives. Optimize your workflow by nesting designs to save material, cutting multiple copies in one job, and weeding in batches.
Where Vinyl Cutters Shine
Vinyl cutters serve diverse industries and projects:
- Signage and vehicle graphics including storefront signs, real estate boards, car door lettering, and full vehicle wraps
- Custom apparel using heat-transfer vinyl for personalized t-shirts, sports uniforms, and baby clothes
- Home décor and crafts including wall quotes, laptop stickers, wedding decorations, and seasonal displays
The vehicle wrap market grows at 16.9 percent annually, driven by mobile advertising demand. The broader DIY market exceeds $44 billion, showing strong consumer interest in personalized items.
Frequently Asked Questions About Vinyl Cutters
What is a vinyl cutter used for?
A vinyl cutter creates custom graphics, letters, and designs from adhesive vinyl and similar thin materials. Common applications include vehicle decals, storefront signs, custom apparel, wall art, stickers