How to Darken Laser Engraving: Quick Tips
If your laser engraving looks too light or lacks contrast, you are not alone. Many users struggle with faint marks, especially on wood and metal. The good news is that you can dramatically darken laser engravings using the right combination of settings, materials, and post-processing techniques. Whether you are working with a 10-watt diode or a high-power CO₂ laser, this guide reveals proven methods to achieve deep brown to near-black results on wood, leather, and metal. You will learn how to optimize focus, power, and speed, use chemical pre-treatments like borax, apply fillers like Marsh stencil ink, and leverage advanced tools like laser marking sprays.
Optimize Power and Speed Settings
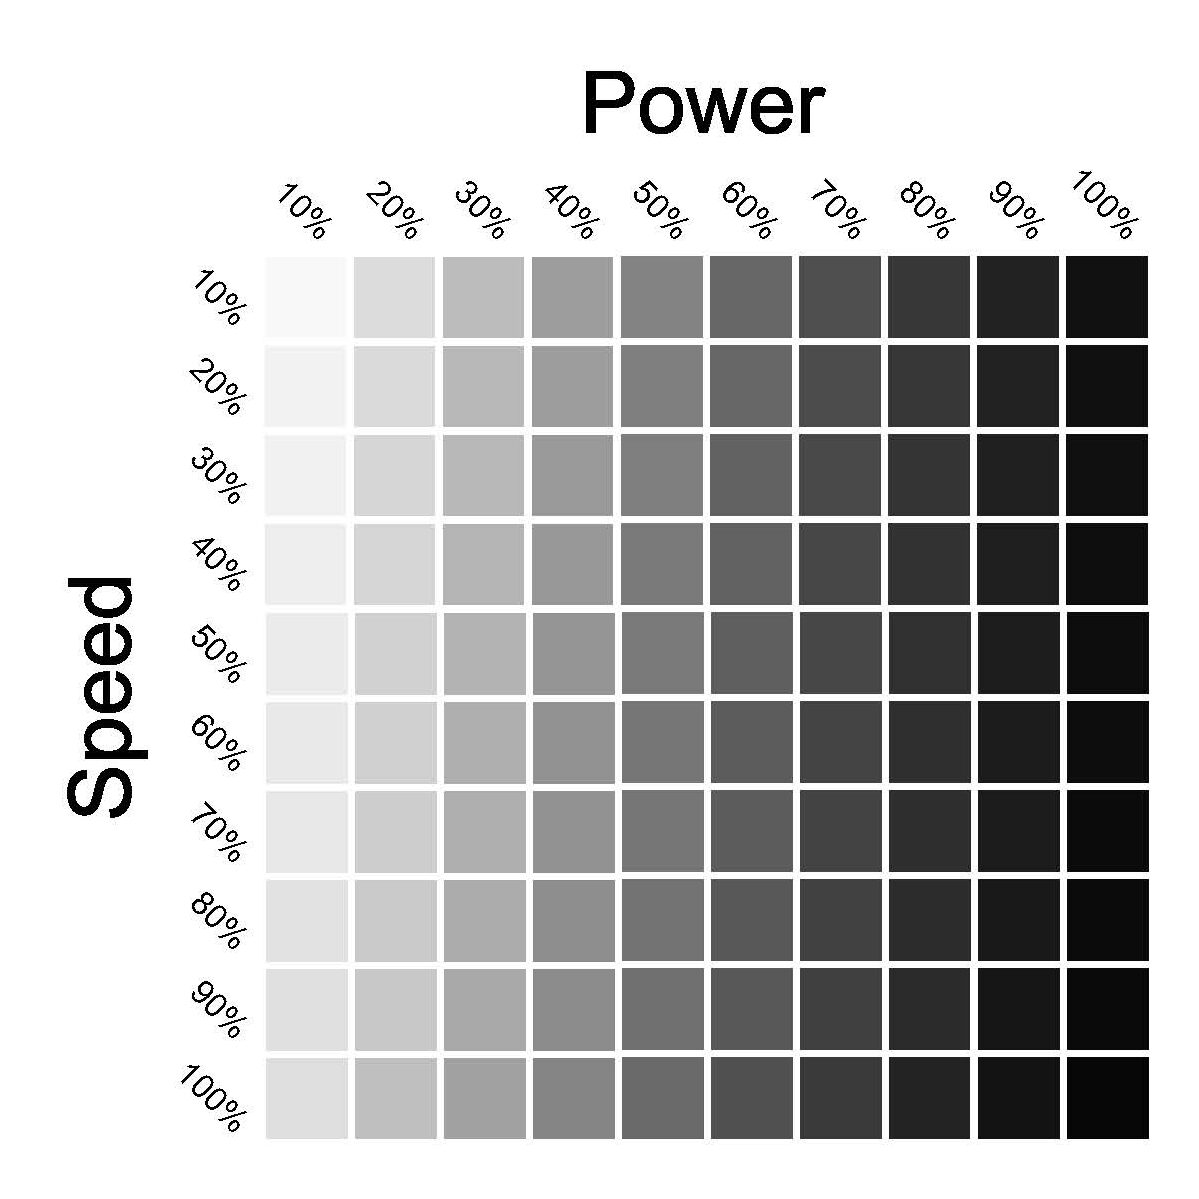
The foundation of a dark engraving starts with your laser settings. Too fast or too weak, and you get a faint mark. Too slow or too strong, and you risk fire or excessive charring.
Run a Power-Speed Test Grid
Start with a 7×7 test grid to find your ideal balance. Use rows for increasing power from 40% to 100% and columns for decreasing speed from 20,000 mm/min to 5,000 mm/min. Use Simple Fill mode with fixed interval around 0.6 mm. For a 10-watt diode laser on maple, the optimal setting is 80% power at 10,000 mm/min, producing a deep brown tone without flaming.
Keep a fire extinguisher nearby when testing high power and slow speeds, as these settings increase fire risk significantly.
Adjust Laser Focus for Surface Charring
Contrary to intuition, slight defocusing creates darker engravings by spreading the beam and promoting surface carbonization instead of clean cutting.
Defocus by 1-2 mm
Test defocus offsets to find what works best for your setup. One millimeter produces slight darkening, while 2 mm delivers the darkest and most consistent result. More than 3 mm causes loss of detail and uneven edges. Use business cards to measure offset, with about 6-7 cards creating a 2 mm gap.
Defocus works best when maximum darkness matters more than precision, making it ideal for logos, text, or artistic fills.
Enable Crosshatch Engraving Mode
Crosshatch doubles scan line density by adding a second pass at 90 degrees, increasing visual darkness by 30-50%.
How to Enable Crosshatch in LightBurn
Select your engraving layer and open Layer Settings. Toggle the Crosshatch option on. Because exposure doubles, reduce thermal load by increasing speed or reducing power slightly. For example, if your baseline is 10,000 mm/min at 80% power, try 14,000 mm/min at 70% power.
The result is rich, uniform darkening without deep cutting, perfect for high-contrast designs.
Optimize Line Spacing (Interval)
Closer scan lines create denser engraving and a darker appearance.
Set Interval Below Spot Size
For 10W diode lasers with spot size between 0.6-0.8 mm, set interval to 0.6 mm. For CO₂ lasers with ~0.1 mm spot size, use 0.08-0.12 mm interval. Test a 7-step interval grid ranging from 0.4-1.0 mm to find your sweet spot.
Avoid intervals below 0.4 mm, as they cause overburning and hotspots on diode lasers.
Use Multiple Passes Strategically
Running the same engraving twice deepens the mark and intensifies color.
Best Practices for Multiple Passes
Use 2-3 passes maximum to avoid warping or fire. Slightly defocus and reduce power per pass, such as 70% power for two passes instead of 80% for one. This technique works particularly well for text and vector lines where boldness matters.
Multiple passes increase heat buildup, so monitor for smoke or ignition during operation.
Choose the Right Wood Species
Not all wood engraves dark. Material selection is critical for achieving rich results.
Top Woods for Dark Engraving
Cherry produces warm dark brown with natural contrast, requiring minimal settings. Walnut delivers very dark brown as dense grain enhances depth. Basswood provides medium brown with even results and low resin. Maple offers light to medium brown, ideal for controlled experiments. Pine should be avoided due to uneven results from resin content.
Cherry and walnut deliver naturally darker engravings, reducing reliance on aggressive laser settings.
Pre-Treat Wood with Borax Solution
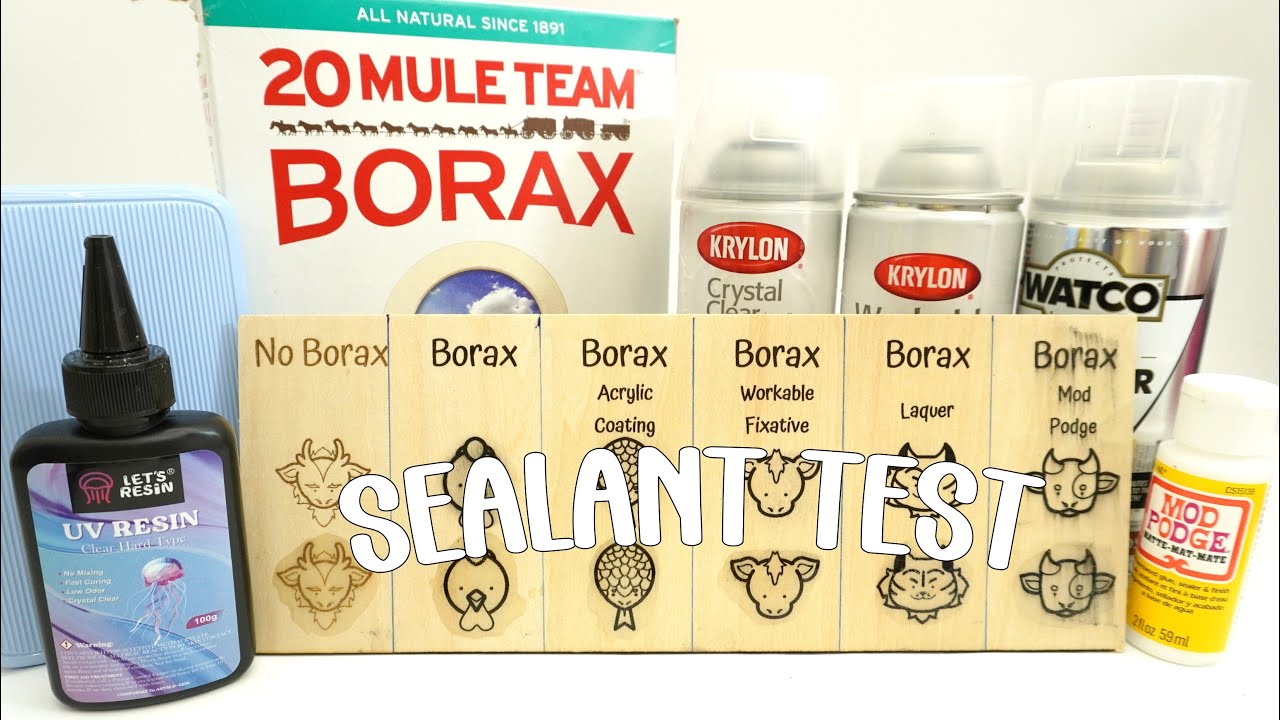
Borax chemically alters wood to char more deeply under laser heat, yielding near-black results.
How to Apply Borax
Mix 1 part borax to 10 parts warm water, creating a 2-3% solution. Brush or spray evenly onto the surface and let dry completely, which takes 20-30 minutes. Test on scrap wood first before applying to your final project.
When engraving borax-treated wood, use lower power since borax accelerates heating. Optimal settings include 80% power, 14,000 mm/min, 2 mm defocus, and crosshatch enabled.
Borax releases toxic fumes when burned, so use strong ventilation and fume extraction. Seal immediately after engraving to prevent smudging.
Try Baking Soda for Consistent Darkening
Baking soda lowers wood ignition point, promoting earlier charring at lower temperatures.
Baking Soda Recipe and Application
Mix 1 tablespoon baking soda per 160 ml of water. Spray or brush on and dry fully before engraving. Results are darker than untreated wood, though not as black as borax. The finish tends to be more even across grain variations but may cause yellowing, so test first.
Baking soda is safer than borax with minimal fumes and no toxic byproducts.
Compare: Borax vs. Baking Soda
Borax achieves near-black darkness but can be uneven across grain. It leaves smudgy residue and requires immediate sealing. Baking soda delivers moderately dark results with more consistent application. It leaves white powder residue that wipes off easily and poses lower safety risk.
Use borax for maximum depth and artistic contrast. Use baking soda for production work where consistency matters more than absolute blackness.
Post-Engrave with Marsh Stencil Ink
For true black with zero bleeding, Marsh Stencil Ink spray is a game-changer.
How It Works
Apply masking tape to the wood surface, then engrave normally. Spray ink immediately after engraving, as it dries on contact. Seal with Rust-Oleum Satin Clear Enamel, then peel the tape when dry.
The fast-evaporating solvent prevents wicking into wood grain, eliminating bleeding or haze. This method costs about $4 per can compared to $18 for Laser Dark.
Only the spray version has been tested; brush or roller forms may behave differently.
Fill Engravings with Paint or Ink
The most reliable method for jet-black or custom-colored results involves filling the engraved grooves.
Step-by-Step Process
Apply oil-based paint, India ink, or Laser Dark to the engraved surface. Work the pigment into grooves with your finger, a brush, or rag. Wipe the surface clean, leaving pigment only in the recesses. Let dry, then seal with polyurethane or acrylic spray if durability is needed.
For custom results, the Willyivy method uses Laser Dark applied with a template, then sands off excess. This leaves sharp, raised edges and does not require sealing unless durability is needed.
Sealed ink resists wear, making it ideal for coasters, signs, and tools.
Darken Leather with Dye and Paste
Light leather needs contrast enhancement after engraving.
Leather Darkening Process
Engrave your design, then apply leather resist to protect the surface. Rub dark paste into the engraved areas, such as Fiebing’s Leather Dye or Kiwi Camp Dry. Wipe off excess, let dry, and apply a finish coat.
This technique produces a vintage, high-contrast look with professional quality. It works best for wallets, belts, and journals.
Use Laser Marking Sprays for Metal
Diode and CO₂ lasers struggle to darken bare metal. Marking sprays solve this problem.
How to Apply Laser Marking Spray
Spray CerMark, Thermark, or Full Spectrum compound on metal and let dry. Engrave with high power and moderate speed. Wash off residue with water or solvent.
This technique produces permanent black or dark gray marks on stainless steel, aluminum, and titanium. No fiber laser is needed, making it ideal for hobbyists and small shops.
Direct Darkening on Metal (Fiber Lasers)
For users with fiber lasers or high-power diodes, direct darkening is possible.
Black Annealing on Stainless Steel
Use a defocused beam with slow speed and high line density. This induces subsurface oxidation and creates a black mark without ablation. Alternatively, apply chemical cold blackening solution after engraving, rub into grooves, and wipe the surface.
Wear gloves and goggles when handling cold blackening solutions, as some are corrosive.
Achieve True Black: 3 Proven Methods
Method 1: Borax Plus Optimized Settings (Wood)
Pre-treat with borax solution, then use 2 mm defocus, crosshatch enabled, 0.6 mm interval, 80% power at 14,000 mm/min. Seal immediately to prevent smudging. This method delivers maximum contrast on art pieces.
Method 2: Paint or Ink Filling (All Materials)
Engrave normally, then fill with black pigment such as oil-based paint, India ink, or Laser Dark. Wipe the surface clean and seal if needed. This is the most reliable method, working on wood, metal, leather, and plastic.
Method 3: Laser Marking Spray (Metal)
Apply CerMark-type spray, engrave, then rinse off excess. This creates permanent, industrial-grade black marks ideal for serial numbers, tools, and awards.
Bonus Tips for Deeper Results
Re-Engrave the Same Area
Running 2-3 identical passes increases depth and darkness. Combine with slight defocus and reduced power per pass for best results.
Use Vector Engraving for Bold Lines
Enable multiple vector passes for text and logos. Adjust focus to widen kerf slightly, simulating bold font effects.
Avoid Common Mistakes
Do not oversand, as this removes fine details. Do not apply wet pre-treatment, which causes uneven burning. Always use ventilation when working with borax and marking sprays. Check LightBurn Z-axis settings and disable unless actively needed.
Final Workflows by Material
Deep Dark Brown (Wood)
Test power and speed to find 80% power at 10,000 mm/min. Set interval to 0.6 mm. Enable crosshatch, then adjust speed to 14,000 mm/min. Defocus by 2 mm. Use maple, basswood, or cherry for best results.
Near-Black (Wood)
Apply borax solution (1:10 ratio), dry completely, then use optimized settings above. Seal with polyurethane or acrylic spray.
True Black (Any Material)
Engrave normally, fill with black paint or ink, wipe surface clean, and seal if needed.
Dark Metal Engraving
Apply laser marking spray, engrave with high power and moderate speed, rinse off excess, and dry thoroughly.
Frequently Asked Questions About Darkening Laser Engravings
Why does my laser engraving look too light?
Your laser settings may be too fast or too weak. Run a power-speed test grid to find the optimal balance. For a 10W diode on maple, try 80% power at 10,000 mm/min. Also check that your focus is correct and line spacing is appropriate for your spot size.
What is the best wood for dark engraving?
Cherry and walnut produce the darkest naturally occurring engravings. Basswood and maple offer more predictable results for testing. Avoid pine due to inconsistent resin content.
Does defocusing the laser make engraving darker?
Yes, slight defocusing spreads the beam and promotes surface charring rather than clean cutting. A 2 mm defocus typically produces the darkest and most consistent results on wood.
Is borax safe for pre-treating wood before laser engraving?
Borax is effective but releases toxic fumes when heated by the laser. Use strong ventilation and fume extraction. Seal the wood immediately after engraving to prevent smudging. Consider baking soda as a safer alternative.
How do I get true black on metal with a diode laser?
Use laser marking spray such as CerMark or Thermark. Apply to metal, let dry, then engrave with high power and moderate speed. Rinse off residue to reveal permanent black marks.
Can I fill laser engravings with regular paint?
Yes, oil-based paint, India ink, and commercial products like Laser Dark work well. Apply to the surface, work into grooves, wipe excess from the surface, and seal if needed for durability.
Key Takeaways for Darkening Laser Engravings
Darkening laser engravings is not about one magic setting. It is a system that combines optimal laser parameters, smart material choices, and targeted chemical or physical enhancements to achieve anything from rich dark brown to permanent black. Start with testing your power and speed settings using a test grid, then optimize interval and enable crosshatch for immediate improvements without additional chemicals. For true black results, use borax pre-treatment on wood or paint filling on any material. On metal, laser marking sprays deliver permanent industrial-grade marks. Always seal treated surfaces when durability matters, and prioritize safety with proper ventilation and fire prevention measures. With these methods, you will never have to settle for a faint engraving again.