How to Increase Laser Intensity: Quick Tips
If your laser isn’t cutting or engraving as expected, even at 100% power, the issue might not be the hardware itself. More often than not, laser intensity is limited by incorrect software settings, mismatched PWM scaling, poor focus, or environmental instability. This guide reveals the exact steps to increase and stabilize laser intensity, from fixing common software misconfigurations to implementing advanced stabilization techniques. You’ll learn how to unlock your laser full potential, whether you’re using a hobbyist diode machine or a precision industrial system.
Fix PWM Scaling in LightBurn
One of the most overlooked causes of weak laser output is incorrect PWM range mapping in LightBurn. Even when you set power to 100%, your laser may only receive a fraction of its possible signal.
Correct the S Value Max Setting
Navigate to Edit → Device Settings → Machine Settings in LightBurn. Locate S Value Max, which defines the maximum PWM value LightBurn sends to your laser driver. If your driver supports 10,000 but S Value Max is set to 1,000, you’re limited to 10% power at full output. Change S Value Max to match your driver true maximum and save changes.
After changing S Value Max, perform a test cut on 6mm plywood. If the backside is no longer intact and the piece falls out cleanly, you have successfully increased intensity.
Match GRBL $30 Parameter
Open the LightBurn console and type $$, then press Enter. Find the line $30=XXXX, which is GRBL max spindle speed used for laser power scaling. Ensure S Value Max in LightBurn matches $30 exactly. Mismatched values cause inconsistent power delivery across different software.
Never guess the correct value. Consult your controller manual for the proper setting.
Avoid Common PWM Mistakes
Many machines ship with outdated or conservative defaults. Avoid using default settings without verification. Do not assume 100% power means full output, because without correct scaling, it does not. Always verify driver specifications, since TTL drivers may expect 0-5V while analog ones use 0-10V.
Run a power test from 10% to 100% in 10% increments. If there is no visible change until the last few steps, your PWM range is likely too low.
Optimize Beam Focus and Optics
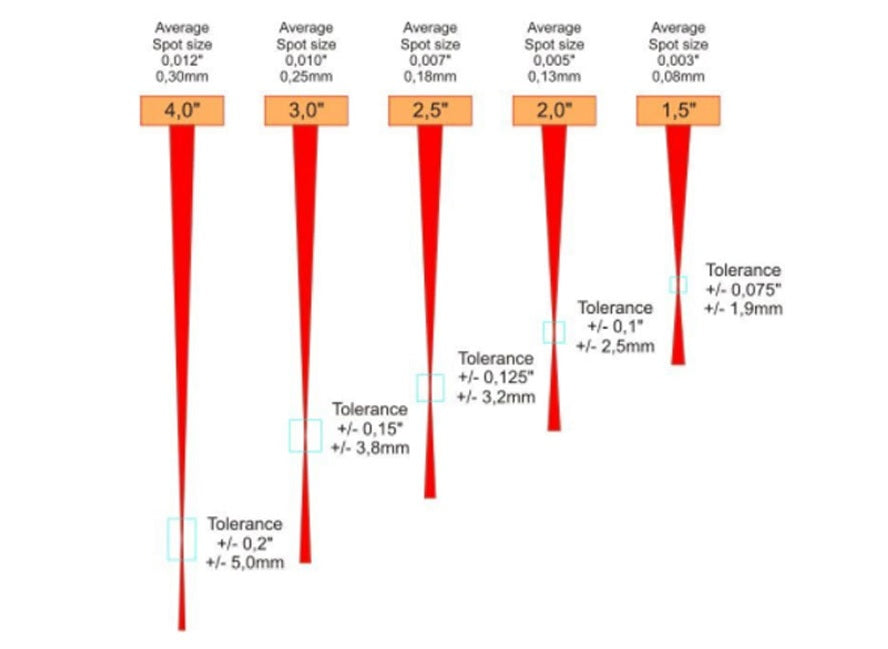
Laser intensity depends on power per unit area. A tightly focused beam delivers higher intensity even with the same total power.
Choose the Right Lens Focal Length
Different lens focal lengths produce different spot sizes and intensity levels. A 1.5″ lens produces the smallest spot and works best for thin materials and fine engraving. A 2.0″ lens offers balanced performance for general cutting and engraving. A 4.0″ lens creates the largest spot and works better for thick material cutting.
For maximum intensity, use a 1.5″ lens. Shorter focal lengths concentrate energy into a smaller spot, increasing W/cm² dramatically. However, shorter lenses have a smaller depth of focus, so slight focusing errors can drastically reduce performance.
Set Accurate Focus Height
Use the manual focus tool or auto-focus probe to set Z-height precisely. Even a 0.5mm deviation can defocus the beam and cut intensity by 30-50%. Always focus at the material surface for surface engraving or mid-thickness for deep cuts.
Clean and Align All Optics
Dust, oil, or oxidation on mirrors and lenses absorb or scatter laser light, reducing delivered power. Clean weekly using lens tissue and isopropyl alcohol (90%+). Wipe in a circular motion from center to edge without rubbing.
Check mirror alignment by performing a dot test at low power. All beams should hit the center of each mirror and lens.
Stabilize Laser Output Actively
For scientific, industrial, or high-precision applications, passive tuning is not enough. You need real-time feedback to maintain constant intensity.
Use Feedback Loops with Photodetectors
Install a beam splitter to divert 1-5% of the beam to a photodiode. Connect the photodiode to a controller that measures actual output and adjusts laser current or an external modulator to correct deviations. This method achieves intensity stability within ±0.5%, which is critical for applications like optical trapping or semiconductor patterning.
Integrate Electro-Optic Modulators (EOMs)
EOMs change light transmission based on applied voltage. Bandwidths up to 800 MHz allow correction of high-frequency noise. They are ideal for pulsed lasers or systems requiring precise amplitude control.
Deploy Noise-Eater Systems
Specialized devices like Conoptics Noise-Eaters suppress high-frequency intensity noise. They automatically detect and correct fluctuations in real time. These systems are common in deep UV and ultrafast laser environments with electrical interference or unstable drivers.
Apply Passive Stability Enhancements
Prevent intensity drops before they happen with environmental and mechanical controls.
Control Laser Temperature
Diode lasers lose efficiency and shift wavelength as temperature changes. Use thermoelectric coolers (TECs) or water chillers to maintain ±0.1°C stability. For DPSS lasers, even a 1°C drift can cause mode hopping or power loss. Every 10°C rise in diode temperature can reduce output by 10-15%.
Dampen Mechanical Vibrations
Mount the laser on a vibration isolation table. Avoid placing it near compressors, HVAC units, or high-traffic areas. In resonant cavity lasers, vibrations cause mode instability and beam wander.
Install Optical Isolators
Use Faraday isolators to block back-reflected light from re-entering the laser cavity. Back reflections cause instability, ripple, or permanent damage in high-power systems. They are essential for fiber lasers and reflective materials like copper or aluminum.
Use Regulated Power Supplies
Choose low-noise, linear power supplies over switching types when possible. Add EMI filters or line conditioners to eliminate ripple. Never share circuits with motors or compressors.
Flickering laser dot or inconsistent engraving depth often traces back to dirty power.
Upgrade Hardware for Maximum Output
Sometimes intensity limits are hardware-bound. Upgrading key components can deliver lasting gains.
Replace Aging Laser Diodes
All laser diodes degrade over time, and output can drop 20-40% after 5,000-10,000 hours. If cleaning, focusing, and tuning do not restore performance, replace the diode module. Match replacement specs for wavelength, power rating, and driver compatibility.
Use High-Quality Drivers
Cheap drivers may lack stable current regulation or proper PWM response. Upgrade to constant-current drivers with soft-start and thermal protection. Ensure the driver supports your laser PWM frequency, which is commonly 20-100 kHz.
Upgrade to Precision Optics
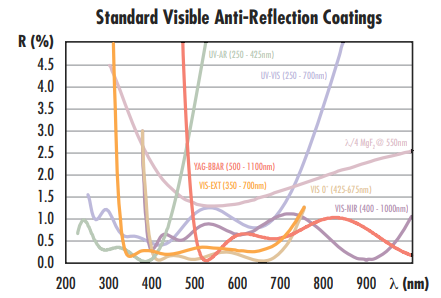
Standard lenses may have aberrations or coating losses. Invest in anti-reflective (AR) coated lenses and dielectric mirrors. AR coatings can improve transmission from 90% to 99.5% per surface. Upgrading two mirrors and a lens can recover 15-20% lost intensity due to absorption.
Prevent Intensity Loss Over Time
Maintaining peak performance requires routine checks and proactive maintenance.
Schedule Regular Maintenance
Clean lenses and mirrors weekly or after 10-20 hours of use. Check beam alignment monthly or after moving the machine. Verify focus accuracy before critical jobs. Log output performance after each major job or weekly. Inspect the cooling system monthly.
Monitor Output Continuously
Use an inline power meter or photodiode monitor to track real-time intensity. Some systems integrate this into control software for automatic alerts. Early detection of drift allows intervention before quality suffers.
Store Settings and Configurations
Save machine profiles in LightBurn with correct S Value Max, $30, and focus height. Document all changes, such as “Fixed S Value Max from 1,000 to 10,000 on 2024-04-10.” This prevents regression after firmware updates or software reinstallation.
Troubleshoot Low Laser Intensity
When output drops suddenly, follow this diagnostic path.
Test Power Delivery First
Confirm S Value Max equals $30. Run a laser test at 100% in LightBurn. Use a power meter or burn paper test to verify output. If weak, check laser enable signal wiring, driver board for overheating, and cooling fan operation.
If the laser cuts well at 50% but poorly at 100%, PWM scaling is likely wrong.
Inspect for Thermal Rollback
Many drivers reduce power when the diode overheats. Symptoms include strong initial cut followed by weakening over time, or a driver heatsink too hot to touch. Solutions include cleaning the heatsink and fan, improving airflow, or adding external cooling.
Eliminate Electrical Noise
Use shielded cables for PWM and enable signals. Route signal wires away from power lines. Add ferrite cores to reduce EMI.
Turn off nearby equipment to test. If laser performance improves, electrical noise was the culprit.
Maximize Intensity by Application
Different tasks demand different approaches to intensity control.
Hobbyist Laser Cutting/Engraving
Prioritize fixing S Value Max, cleaning optics, and using a 1.5″ lens. Stability needs are moderate. Correcting PWM scaling often doubles effective intensity.
Industrial Material Processing
Prioritize active feedback, stable power, and temperature control. Stability needs are high. Use EOMs, inline monitors, and water chillers.
Optical Tweezers and Microscopy
Prioritize extreme stability, vibration damping, and noise suppression. Stability needs are ±0.1% or better. Use feedback loops, Faraday isolators, and acoustic enclosures.
Semiconductor and Wafer Processing
Prioritize repeatability and pulse-to-pulse consistency. Stability needs are very high. Use noise-eaters, precision TECs, and beam diagnostics.
Frequently Asked Questions About Increasing Laser Intensity
What causes laser intensity fluctuations?
Power supply instability, temperature changes, mechanical vibrations, component aging, and back reflections into the laser cavity all cause intensity fluctuations. Identifying the root cause requires systematic testing of each factor.
Why is laser intensity stabilization important?
Stabilization ensures reproducible results, increases product yield, and prevents defects in sensitive processes like wafer fabrication. It also improves safety and repeatability across all laser applications.
How can I make sure my laser runs at true 100% power in LightBurn?
Confirm that S Value Max in Device Settings matches the GRBL $30 value. Ensure the value reflects your laser driver expected maximum PWM input, such as 10,000 instead of 1,000. Validate with a physical test cut.
What active methods stabilize laser intensity?
Feedback loops with photodiodes measure actual output and adjust in real time. Electro-optic modulators (EOMs) provide bandwidths up to 800 MHz for fast corrections. Noise-eater systems suppress high-frequency noise in pulsed laser applications.
What passive techniques help maintain laser intensity?
Temperature stabilization using TECs or chillers prevents thermal drift. Vibration isolation tables maintain beam alignment. Optical isolators prevent back-reflection damage. High-quality stable power supplies minimize ripple-induced fluctuations.
What components are essential for a stabilization system?
Photodetectors operating from 192 nm to 2000 nm measure output. High-speed EOMs provide bandwidth up to 800 MHz. Stable drive electronics and precision controllers process feedback. Optical isolators and thermal management units complete the system.
Key Takeaways for Maximizing Laser Intensity
Increasing laser intensity starts with correct PWM scaling, which is a simple software fix that unlocks full hardware capability. Verify that S Value Max in LightBurn matches your GRBL $30 parameter immediately. From there, focus optimization, thermal control, and environmental stability turn good performance into professional-grade results.
Whether you are troubleshooting weak output or building a lab-grade system, this guide provides the actionable steps to achieve and maintain maximum laser intensity. Always verify changes with real-world tests, document configurations, and maintain your system proactively. Start by checking your PWM settings today, then work through optics, temperature, and stabilization techniques as needed.