How to Laser Engrave Leather: Quick Steps
Laser engraving leather transforms ordinary hides into personalized masterpieces with precision, speed, and lasting detail. Whether you are crafting custom wallets, engraved belts, or artisanal journals, the laser offers unmatched accuracy compared to traditional stamping methods. This guide walks you through every step, from choosing the right laser to post-engraving care, so you can produce clean, high-contrast results on natural and synthetic leathers.
You will learn which lasers work best for your needs, how to prepare leather safely, optimal settings by material type, and how to finish engravings for durability and visual impact. Each section provides actionable steps backed by proven techniques from industry experts.
Choose the Right Laser Type for Leather
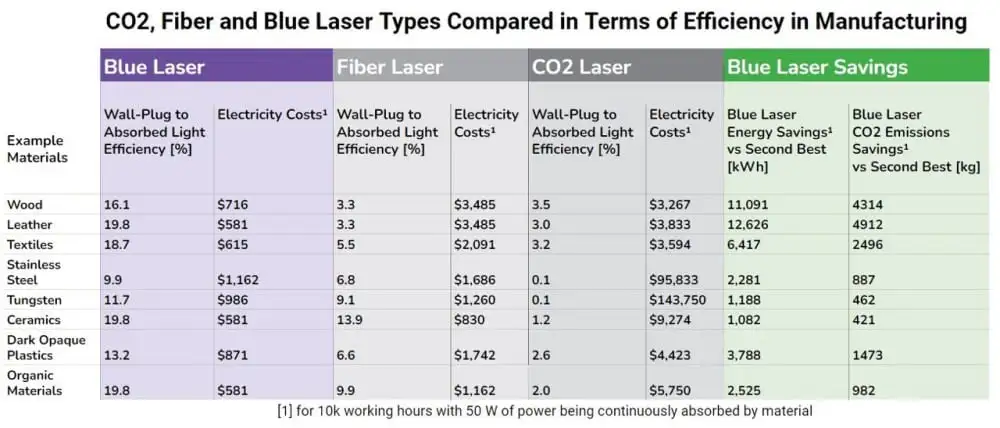
Not all lasers handle leather equally. Your choice affects speed, depth, contrast, and overall safety during operation.
CO₂ Lasers Deliver Superior Results
CO₂ lasers are the industry standard for leather engraving because their 10.6-micron wavelength is highly absorbed by organic materials like leather.
- They engrave faster and deeper than diode alternatives
- They support both engraving and cutting leather up to 6mm thick
- They work excellently on full-grain, veg-tan, and top-grain leathers
- Industrial models like Epilog Fusion or xTool P2 offer precision, speed, and advanced features like camera alignment
Machines with 3D curve technology adjust focus dynamically, allowing even engraving on curved leather items like holsters or boots.
Diode Lasers Work for Light Duty
Diode lasers are compact, enclosed, and budget friendly, making them perfect for beginners or hobbyists.
- Best suited for thin leather between 3 and 5 ounces
- Slower and less powerful, often requiring multiple passes for deep marks
- The xTool S1 at 40W is among the strongest enclosed diode options
- LaserPecker 4 supports mobile engraving with dual lasers
Avoid using diode lasers on PVC-containing faux leathers because they release toxic fumes that damage your machine and pose health risks.
Select the Best Leather Types for Engraving

The leather you choose directly impacts engraving quality, contrast, and safety during the process.
Natural Leathers Produce Best Results
Natural leathers respond best to laser engraving due to their organic composition.
- Full-grain leather produces deep, high-contrast engravings ideal for wallets and journals
- Vegetable-tanned leather turns a rich brown when lasered, perfect for artisanal work
- Top-grain leather offers slightly sanded surfaces that yield clean, consistent results
- Chrome-tanned leather may discolor under heat, so always test a small area first
Veg-tanned leather darkens beautifully under laser, mimicking hand-tooled aesthetics without manual carving.
Avoid PVC and Vinyl-Based Synthetics
Not all faux leathers are safe for laser engraving.
- PU leather (polyurethane) is safe if PVC-free and produces moderate contrast
- PVC or vinyl-coated leather must never be lasered because it releases hydrochloric acid
- Bonded leather produces mixed results due to synthetic binders
- Exotic leathers like eel can be engraved but may emit strong odors
Always confirm material content with supplier specifications before loading leather into your machine.
Prepare Leather for Engraving
Proper preparation prevents warping, scorching, and misalignment during the engraving process.
Clean and Dry the Surface Thoroughly
Dirt, oils, or moisture interfere with laser absorption and can ruin your results.
- Wipe with a damp cloth and mild soap, then dry completely
- Use isopropyl alcohol at 70% concentration for stubborn residues
- Never engrave damp leather unless you are intentionally using light moisture to enhance contrast
Apply Masking Tape for Protection
Reduce edge charring and protect surrounding areas from heat damage.
- Use low-tack masking tape or adhesive film designed for laser use
- This helps with alignment when positioning complex designs
- Peel off after engraving to reveal clean edges
Lightly dampen the back of the leather (not the surface) to reduce smoke and improve pliability, but never soak the material.
Set Up Your Design and Software
Your digital file determines the final look and precision of the engraving.
Use LightBurn for Full Control
LightBurn is the industry standard software for laser design and machine control.
- Import SVG, PNG, DXF, and AI files seamlessly
- Adjust power, speed, PPI, and pass count for each layer independently
- Preview the engraving path in real time before running the job
- Supports rotary attachments and curved surface compensation
Use high-contrast images and vector outlines for sharp results. Avoid blurry or low-resolution photos because they produce poor engraving quality.
Focus and Position the Laser Correctly
Accurate focus ensures consistent depth and clarity across the entire design.
- LaserPecker 4 requires maintaining 150mm from the surface
- xTool P2 and S1 use LIDAR auto-focus for precise height adjustment
- Epilog systems employ IRIS Camera for visual alignment directly on the material
Modern camera systems let you snap a photo of your leather and drag your design directly onto it, eliminating guesswork in positioning.
Adjust Engraving Settings for Perfect Results

No universal settings exist for all leather types. Always test on scrap material first.
Start with These Baseline Parameters
| Laser Type | Power | Speed mm/s | PPI | Passes | Best Use |
|---|---|---|---|---|---|
| CO₂ 55-100W | 20-50% | 100-300 | 300-600 | 1-2 | Deep engraving |
| Diode 10-40W | 60-100% | 100-500 | 500-1000 | 1-2 | Surface marks |
| LaserPecker 4 | 100% | N/A | 1000 | 1 | Quick personalization |
To darken engraving, increase power or reduce speed. To reduce burning, lower power or increase speed, and always enable air assist.
Use Air Assist to Prevent Charring
Air assist blows compressed air at the engraving point to cool the surface and remove smoke.
- Prevents soot buildup on the leather surface
- Reduces fire risk when engraving thicker hides
- Produces cleaner edges and more detailed results
Air assist is essential for thick or dark leather where charring is most likely to occur.
Execute the Engraving Job Safely
Execute with safety and precision by following proper operational procedures.
Preview Before Starting
- Click Frame to outline the engraving area on the leather
- Confirm alignment using the red dot pointer or camera view
- Ensure the leather lies flat and secure on the bed
Monitor the Process Throughout
- Watch the first few seconds of engraving to verify proper depth
- Listen for unusual sounds or notice smoke spikes
- Ventilation should activate automatically to manage fumes
The smell of burning hair is normal, but never ignore smoke or flames. Leather is flammable, so keep a fire extinguisher nearby and choose machines with flame sensors like xTool P2 or Epilog systems.
Clean and Finish Engraved Leather
Post-processing enhances appearance and longevity of your engraved designs.
Remove Soot with Alcohol Wipe
Carbon residue is common after engraving and must be cleaned promptly.
- Dampen a soft cloth with 70% isopropyl alcohol
- Gently wipe the engraved area to remove soot
- Avoid soaking the leather because alcohol can dry it out if overused
Condition and Seal the Engraving
Protect the mark and enrich the color with proper conditioning.
- Apply mink oil or neatsfoot oil to deepen engraving and prevent cracking
- Rub in beeswax for a matte, natural finish
- Use acrylic sealant for high-wear items like belts or dog collars
Conditioning veg-tanned leather after engraving brings out a warm, antique look that enhances the visual impact.
Troubleshoot Common Engraving Problems
Fix problems quickly to avoid wasted material and time.
Engraving Appears Too Light
- Increase laser power or reduce engraving speed
- Try a second pass if depth remains shallow
- Verify focus is correct because misfocus causes blurry marks
Burning or Charring Occurs
- Lower power or increase speed to reduce heat buildup
- Enable air assist to cool the surface continuously
- Apply masking tape to reduce edge scorch on sensitive areas
Uneven Results on Curved Surfaces
- Enable 3D curve compensation if your machine supports it
- Attach a rotary jig for cylindrical items like flasks
- Manually adjust Z-height for domed or uneven areas
Frequently Asked Questions About Laser Engraving Leather
What types of leather can be laser engraved?
Most natural leathers including full-grain, top-grain, vegetable-tanned, and chrome-tanned can be laser engraved successfully. Avoid PVC-containing synthetics because they release toxic fumes. Always test a small area first when trying new leather types.
How do I make laser engraving darker on leather?
Increase laser power or decrease engraving speed to create darker marks. Multiple passes can also deepen the color. Applying leather conditioner or oil after engraving darkens the remaining material and enhances contrast.
Should I wet leather before laser engraving?
Lightly dampening leather can improve results by reducing smoke and enhancing contrast. Do not soak the leather because excess moisture affects engraving quality and can cause uneven results.
How do I clean leather after engraving?
Wipe the engraved area with a soft cloth dampened with 70% isopropyl alcohol to remove carbon soot. Use a specialized leather cleaner if available, and avoid abrasive materials that could damage the surface.
How do I seal and protect engraved leather?
Apply leather conditioner, beeswax, or acrylic sealant after cleaning. Mink oil or neatsfoot oil deepens the engraving color and prevents cracking. Acrylic sealant works best for high-wear items exposed to moisture.
Key Takeaways for Laser Engraving Leather Success
Laser engraving leather merges modern technology with timeless craftsmanship to create durable, high-contrast designs on wallets, belts, journals, and more. The most important factors for success are choosing the right laser type for your needs, selecting appropriate leather materials, and testing settings on scrap pieces before production.
Prioritize safety by ensuring proper ventilation, using air assist, and monitoring machines during operation. Post-engraving care through cleaning and conditioning protects your work and enhances visual appeal. Whether pursuing personal projects or commercial production, invest in quality equipment and accessories like rotary attachments that expand your capabilities over time.
Start with simple projects like keychains or monogrammed wallets, then progress to more complex items as you refine your technique and understand how different leathers respond to various laser settings.