How to Design for Laser Cutting: A Complete Guide
Laser cutting transforms digital designs into precise physical objects, but only if your files are built correctly. Whether you are crafting a wooden keychain, assembling a 3D lampshade, or prototyping a mechanical enclosure, how to make design for laser cutting properly is the foundation of success. A single gap in a vector path or unconverted text can ruin an entire job. This guide walks you through the complete process using vector files, choosing software, handling kerf, structuring layers, and avoiding common mistakes so your design cuts cleanly the first time.
From selecting SVG or DXF formats to converting images and optimizing layouts, every step impacts the final result. You will learn how to prepare artwork in tools like Inkscape, Illustrator, or LightBurn, account for material removal known as kerf, and use generators like Boxes.py for instant 3D assemblies. By the end, you will have a repeatable workflow that turns ideas into real, interlocking parts fast.
Choose the Right File Type for Laser Cutting
Your laser cutter only understands two kinds of digital instructions: paths to cut and areas to engrave. Using the correct file type ensures your design is interpreted accurately by the machine.
Use Vector Files for Cutting
Vector graphics define shapes with mathematical lines and curves, not pixels. This means they scale infinitely without losing quality, which is essential for precision cutting.
• SVG (Scalable Vector Graphics): The most widely supported format for laser cutting. Ideal for logos, text, and artwork.
• DXF (Drawing Exchange Format): Preferred for technical drawings and CAD based designs. Maintains dimensional accuracy for engineering parts.
Always export cutting paths as SVG or DXF. Never use JPG or PNG for cut lines. Software like Inkscape, Adobe Illustrator, CorelDRAW, LightBurn, and xTool Creative Space fully support these formats. Avoid saving as PDF unless absolutely necessary because some laser controllers struggle with embedded fonts or layers.
Reserve Raster for Engraving Only
Raster images like JPG and PNG are made of pixels and degrade when scaled. They are only used for engraving, never for cutting.
• Use raster for: Photos, shaded illustrations, textured patterns
• Never use raster for: Cut lines, outlines, or any path requiring precision
If you start with a raster image, trace it into vector paths using tools like Image Trace in Illustrator, Trace Bitmap in Inkscape, or Auto Trace in LightBurn. Always clean up traced paths by removing stray nodes, closing gaps, and deleting internal lines before cutting.
Pick the Best Design Software
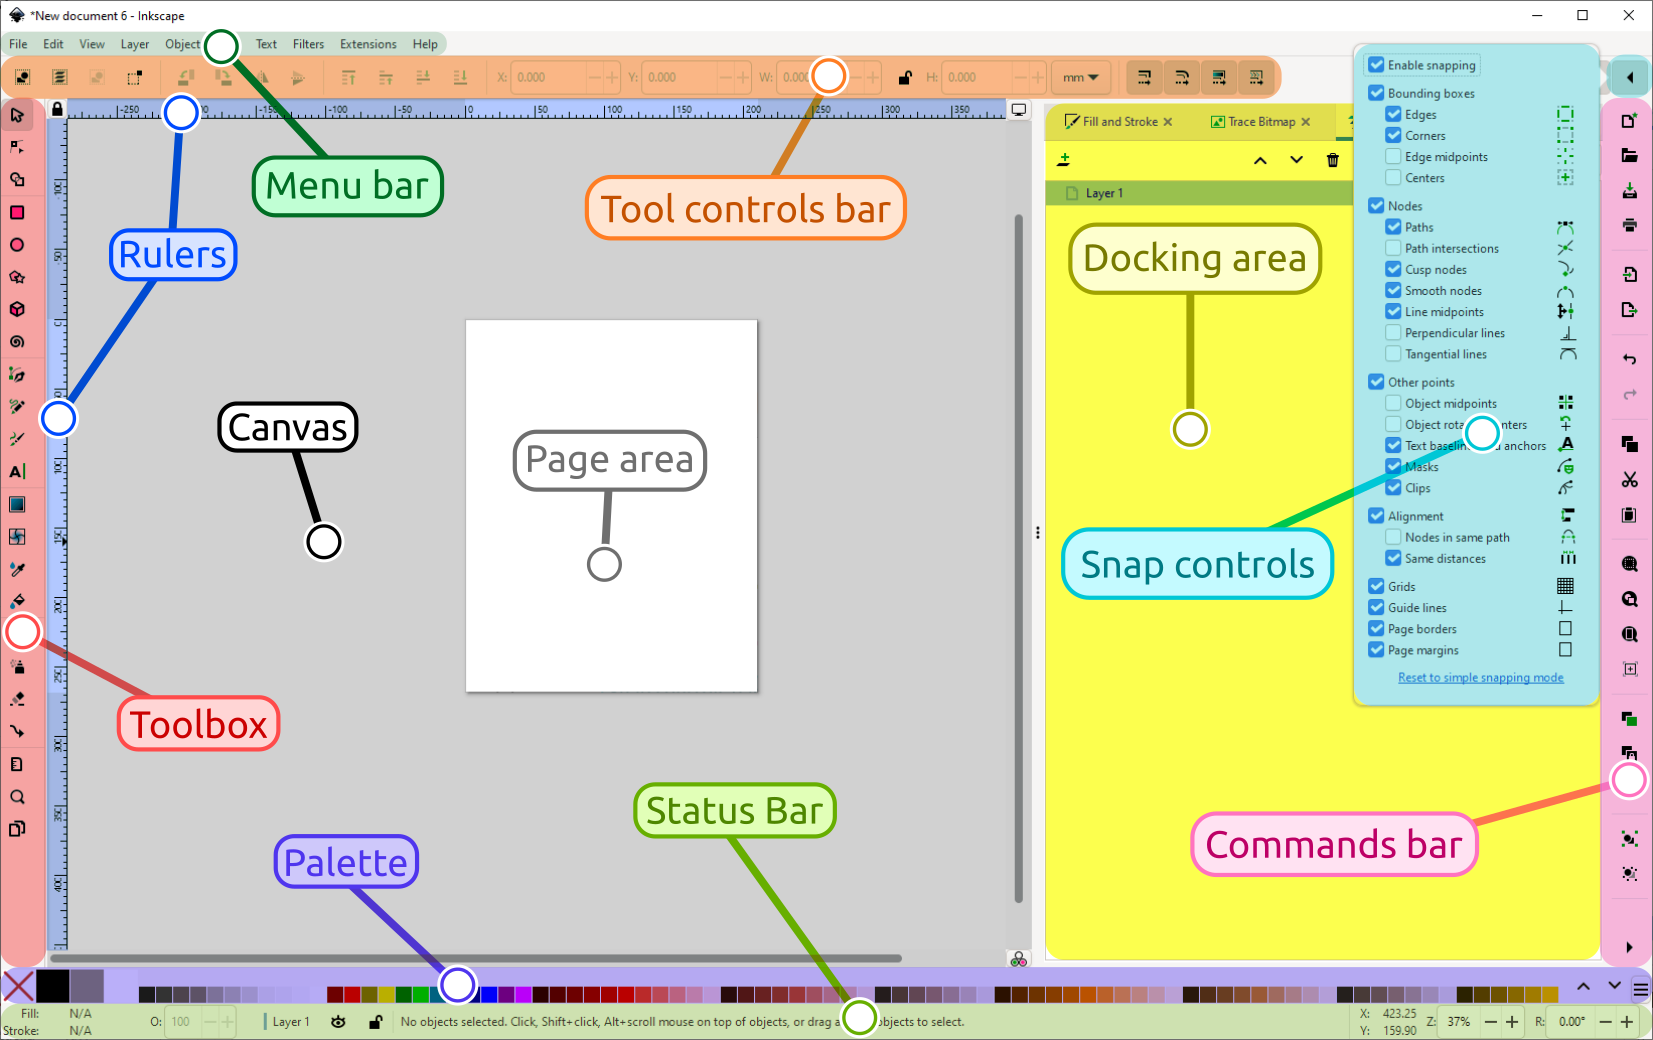
The right software streamlines your workflow and prevents errors. Choose based on your skill level and project needs.
Professional Tools for Precision
| Software | Best For |
|---|---|
| Adobe Illustrator | Logos, text-heavy designs, scalable artwork |
| CorelDRAW | Technical drawings, easy DXF export |
| AutoCAD | Engineering parts, architectural models |
These offer advanced node editing, alignment tools, and reliable export options. Use Illustrator’s Create Outlines feature to lock in text before exporting.
Free and Beginner-Friendly Options
| Software | Best For |
|---|---|
| Inkscape | Open-source SVG editing, great for hobbyists |
| Silhouette Studio | Simple shapes, crafting projects |
| xTool Creative Space | Integrated design and machine control |
Inkscape is powerful and free, ideal for learning vector design. Use its Path Object to Path command to convert text into outlines.
Online Converters Require Cleanup
Tools like Picsvg.com convert JPG or PNG to SVG online. Results vary, so always open the file in a vector editor to fix broken paths or gaps. After conversion, zoom in to check all lines are closed and continuous because a single gap will stop a cut.
Set Up Layers Correctly
Organizing your design by function prevents confusion and ensures proper laser execution. Separate your design into distinct layers with clear purposes.
Assign Functions by Layer
• Cut Layer: Full-through cuts like outlines and shapes
• Score Layer: Surface etching for fold lines and markings
• Engrave Layer: Filled areas like images and text fills
In LightBurn, common color codes help identify layer functions. Red typically indicates cut lines with 0.1 point stroke. Blue indicates score lines with 0.001 inch line. Black indicates engrave areas using filled shapes or thick lines. Always check your laser software layer rules because colors and settings vary by machine.
Convert Text to Outlines
Never leave text editable in your final file. Different software handles this differently.
• In Illustrator: Select text, then choose Type Create Outlines
• In Inkscape: Select text, then choose Path Object to Path
• In CorelDRAW: Right-click and choose Convert to Curves
This prevents font issues when opening the file on another computer or laser system.
Account for Kerf in Your Design
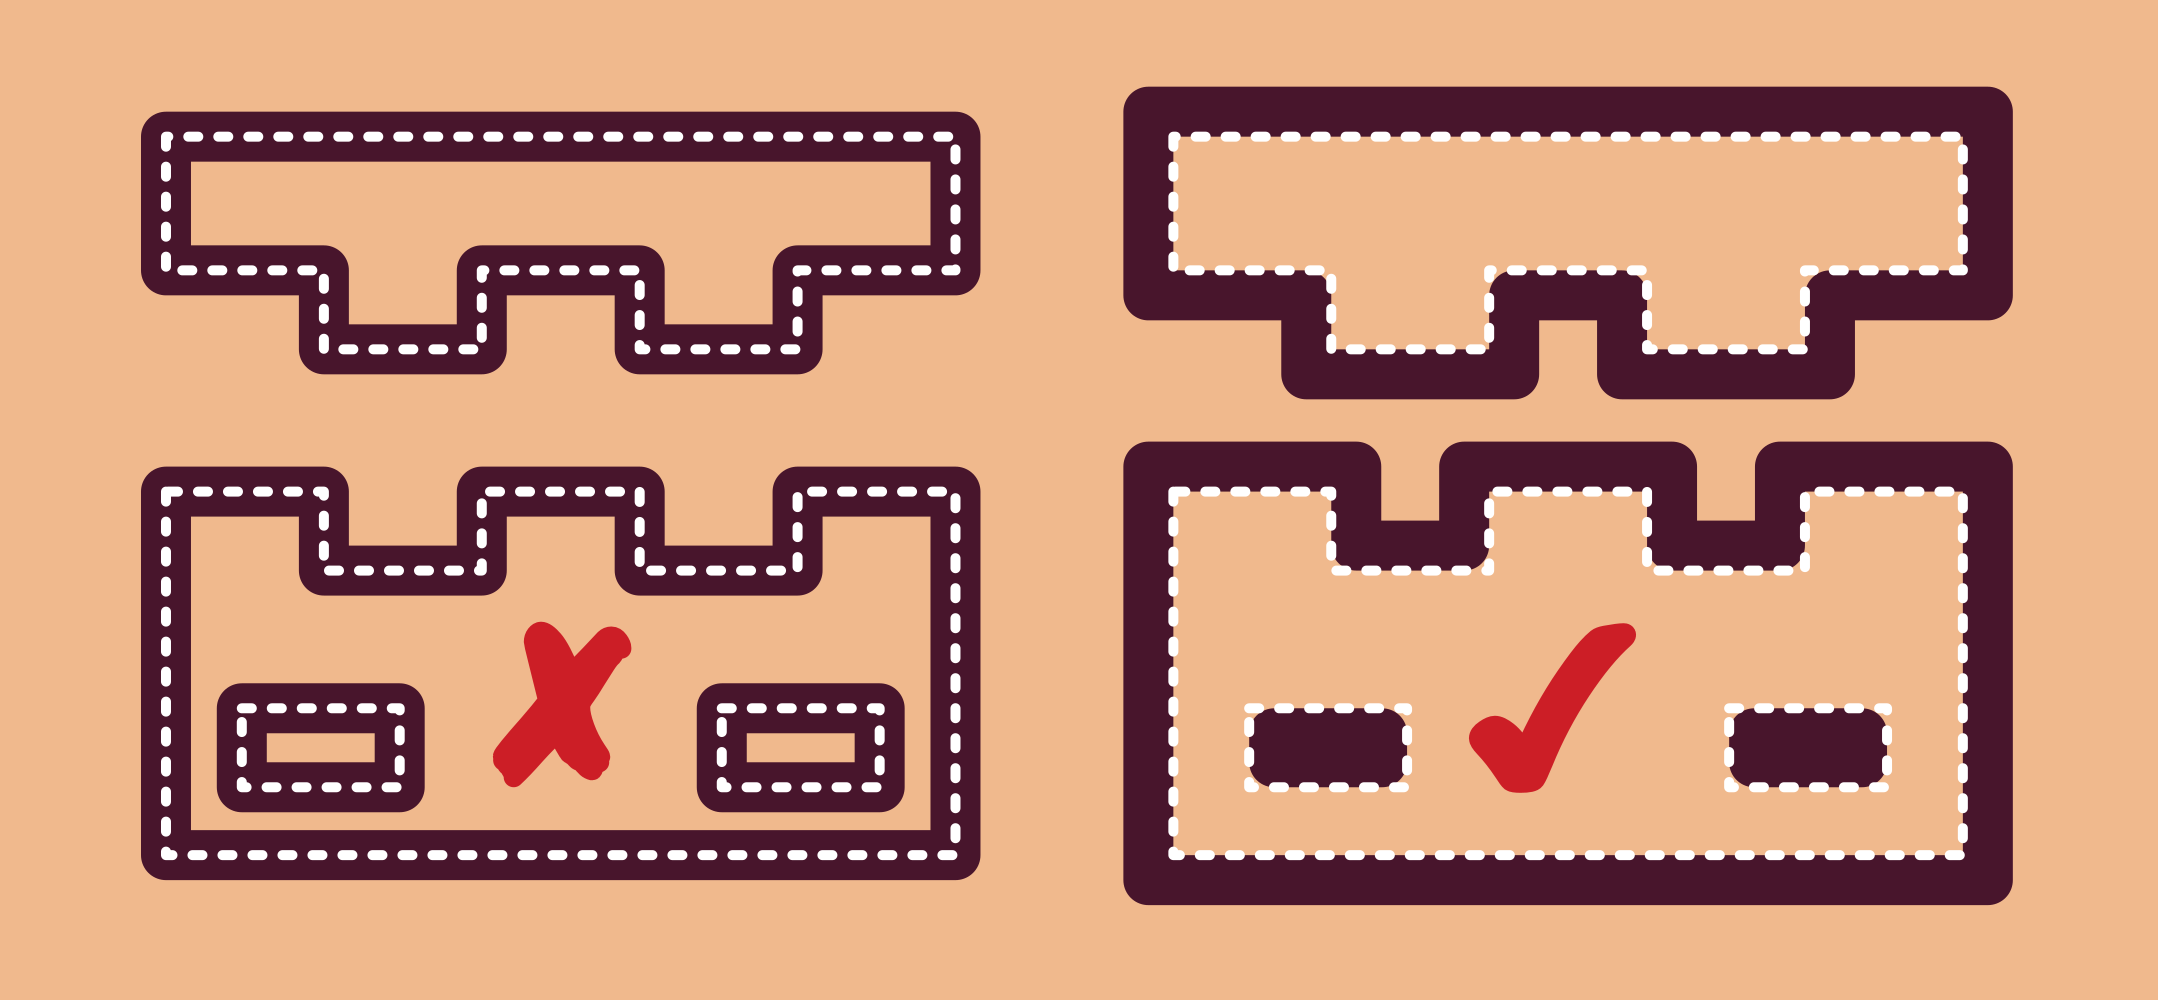
Kerf is the width of material the laser burns away, typically ranging from 0.1 to 0.3 mm depending on power, speed, and material. Ignoring kerf causes poor fit in interlocking parts.
Why Kerf Matters
When kerf is ignored, tabs may be too loose and boxes will not snap together. Precision assemblies fail because parts do not align correctly. For tight joints like finger joints, you must compensate to achieve snug fits.
How to Compensate
Adjust slot width equals material thickness plus or minus half the kerf. For example, with 3mm wood and 0.2mm kerf, make slots 3.1mm wide for a tight fit. The best practice is running a test cut on scrap material, measuring the actual kerf, then adjusting your design or using offset settings in LightBurn to compensate automatically.
Design 3D Assemblies from 2D Sheets
Laser cutting lets you build 3D objects using smart joint techniques on flat sheet materials.
Use Tab-and-Slot Joints
Interlocking fingers hold boxes, enclosures, and frames together without glue. Design tabs and slots to match material thickness, then add kerf compensation for a snug fit. Use online generators like Boxes.py to auto-create joints that would be time-consuming to draw manually.
Add Living Hinges for Flexibility
A living hinge uses parallel cuts to allow thin material to bend. This technique works best in 3mm wood or flexible acrylic. Cut depth should be approximately 80% of material thickness with spacing of 0.5 to 1mm between cuts. Avoid placing hinges near edges by adding at least 5mm of solid material for stability.
Embed Screws and Nuts
For strong, reusable joints, design recessed pockets for T-nuts or threaded inserts. Use material thickness to support hardware, for example 6mm plywood works well for M3 nuts. Drill pilot holes if needed for clean assembly.
Follow a Step-by-Step Design Workflow
A structured process reduces errors and speeds up production from idea to finished piece.
Sketch and Find Inspiration
Start with hand-drawn sketches or browse online platforms for ideas. Thingiverse, xTool Projects, and Ponoko Makeables offer thousands of ready-to-cut models. For parametric projects, try Boxes.py or GitHub design generators. Define your goal first: Is it functional, decorative, or educational?
Create the Vector Design
Open your preferred software and set document size to match your laser bed, for example 400 by 300mm. Create separate layers for Cut, Score, and Engrave functions. Draw shapes using pen, rectangle, or circle tools. Convert all text to outlines. Finally, ensure all paths are closed and gap-free by zooming in to inspect every connection.
Trace and Clean Raster Images
If using a photo or logo, import the JPG or PNG into LightBurn or Inkscape. Use Trace Bitmap or Image Trace to convert it to vector. Adjust threshold settings to capture details without including noise. Delete the original image after tracing, then ungroup and remove unwanted internal lines. Zoom in to manually close any open paths. With practice, this cleanup takes 5 to 10 minutes.
Optimize Layout and Nesting
Maximize material use by rotating and flipping parts to fit tightly together. Avoid overlapping vectors that could cause cutting errors. Use frame preview in LightBurn to verify the job fits within your bed area. Leave at least 5mm between parts for safety and clean edges.
Assign Laser Settings Correctly
Even perfect designs fail with wrong settings. Matching power and speed to your material is critical.
Set Power and Speed by Material
| Material | Cut Settings (3mm) | Engrave Settings |
|---|---|---|
| Wood | 85% power, 10 mm/s | 35%, 2000 mm/s |
| Acrylic | 90%, 8 mm/s | 25%, 1500 mm/s |
| Cardboard | 60%, 20 mm/s | 20%, 3000 mm/s |
Always test on scrap material first because settings vary by machine and material batch.
Use Burn Offset for Kerf Compensation
In LightBurn, apply kerf offset to automatically adjust cut lines. Select your cut lines and apply inner or outer offset based on part type. Use outer offset for external cuts and inner offset for holes. This avoids manual redesign when switching between different materials.
Simulate Before Cutting
Run a simulation to confirm cutting order, typically engrave first then cut. Detect stray lines or orphaned paths that could cause problems. Verify the job fits within bed area. Fix any issues before sending the file to the laser.
Use Generators for Fast 3D Projects
Skip manual design with parametric tools that generate ready-to-cut files instantly.
Try Boxes.py for Instant Enclosures
Boxes.py generates laser-cut 3D models from simple dimension inputs.
Make a Simple Tray
Input your dimensions like 37 by 27 by 7cm and material thickness like 3mm. Set burn offset to zero and compensate later in LightBurn. Generate the SVG, import it into your laser software, assign settings, and cut. From setup to finished piece takes under 10 minutes.
Build a Pencil Case
Use the Card Box generator in Boxes.py. Set length, width, and height. Remove extra compartments to keep it simple. Add decorative engraving patterns inset by 3mm from edges. During assembly, glue the sides, attach rails, sand edges smooth, and apply candle wax for a smooth sliding action.
Create a Tapered Lampshade
Use the Regular Box generator with 7 sides. Set different top and bottom radii to create the taper. Export the SVG, then modify it in LightBurn by adding a center hole for the lamp shaft. Separate the panels and assemble by sliding the base over your lamp, attaching sides sequentially, then sanding and cleaning for the final mount with an Edison bulb.
Choose Safe, Cuttable Materials
Not all materials are safe to laser cut. Know your material before starting.
Approved Materials
• Wood (plywood, balsa): Natural fibers, clean cuts
• Acrylic (PMMA): Polished edges, excellent for signage
• Cardboard, paper: Low power requirements, great for prototypes
• Leather, felt: Thin types only
• Delrin (POM): Durable for gears and moving parts
• Anodized aluminum: Engraving only, not cutting
Never Cut These Materials
• PVC or Vinyl: Releases toxic chlorine gas
• Polycarbonate (Lexan): Catches fire easily
• HDPE (milk jugs): Melts instead of vaporizing
• Coated or laminated materials: May emit hazardous fumes
Always verify material safety with your facility or manufacturer before cutting.
Test, Calibrate, and Optimize
Never skip testing. Saving time and material is worth the extra step.
Run a Test Cut
Cut a 10mm square on scrap material of the same type and thickness. Measure the actual size and calculate kerf by dividing the difference by two. Adjust joint tolerances by plus or minus 0.1mm based on results.
Calibrate Power and Speed
Create a 5 by 5 grid with varying power from 60 to 100% and speed from 5 to 20mm per second. Find the setting that cuts fully through without charring. This calibration ensures consistent results across projects.
Focus the Laser
Use a focus tool to set the correct nozzle-to-material distance. Use auto-focus if your machine has it available, like xTool and Glowforge models. Proper focus directly affects cut quality and edge smoothness.
Assemble and Finish Your Project
Final touches make your project professional and polished.
Join Parts Securely
| Method | Use Case |
|---|---|
| Press Fit | Quick, glue-free assembly |
| Wood Glue or Epoxy | Permanent bonds |
| Screws and Inserts | High-strength builds |
| Magnets | Hidden closures |
Sand and Smooth Edges
Use 220 or higher grit sandpaper to remove sharpness and roughness. Round corners for safety and a refined look. Wipe with a cloth to remove dust before applying any finish.
Add Color and Protection
Fill engraved areas with crayons, markers, or paint for vibrant designs. Apply candle wax to sliding parts for smooth motion. Seal wood with oil or varnish for durability and longevity.
Access Free Resources and Project Ideas
Get inspired and speed up design with these free tools and communities.
Online Platforms
• Boxes.py: Free parametric generator for enclosures
• Thingiverse: Thousands of laser-cut models
• xTool Projects: User-shared templates
• Ponoko Makeables: Curated project library
• GitHub: Open-source design scripts
Project Types to Try
• Functional: Organizers, tool holders, trays
• Decorative: Wall art, lampshades, signs
• Educational: 3D puzzles, mechanical models
• Wearables: Jewelry, badges, accessories
Follow the Best Practices Checklist
Before designing, know your material type and thickness. Understand your machine kerf. Choose correct software and file format.
During design, use vector paths for cuts. Convert text to outlines. Close all paths with no gaps. Separate layers by function. Account for kerf in joint design.
Before cutting, clean up traced images. Nest parts efficiently. Assign correct laser settings. Run simulation to verify everything.
After cutting, test fit parts. Sand and finish edges. Apply color or protective coating as needed.
For safety, never cut PVC or polycarbonate. Wear protective eyewear. Ensure proper ventilation in your workspace.
Frequently Asked Questions About Laser Cutting Design
What file format is best for laser cutting?
SVG and DXF are the best formats for laser cutting because they contain vector paths that the laser can follow precisely. SVG works well for artwork and designs while DXF is preferred for technical drawings. Always avoid raster formats like JPG or PNG for cutting lines.
How do I convert text to paths for laser cutting?
In Adobe Illustrator, select your text and go to Type Create Outlines. In Inkscape, select text and choose Path Object to Path. In CorelDRAW, right-click and select Convert to Curves. This ensures fonts render correctly on any machine.
What is kerf and why does it matter?
Kerf is the width of material removed by the laser beam during cutting. It typically ranges from 0.1 to 0.3mm. If you ignore kerf, interlocking parts like boxes and joints will fit loosely or not at all. Always compensate by adjusting slot widths or using offset settings in your laser software.
Can I use images for laser cutting?
You can use raster images like JPG or PNG for engraving, but they must be converted to vector using tracing tools first. Use Image Trace in Illustrator, Trace Bitmap in Inkscape, or the Trace function in LightBurn. Clean up the traced paths by removing stray nodes and closing gaps.
What materials are unsafe to laser cut?
Never cut PVC, vinyl, polycarbonate, or HDPE. These materials release toxic fumes or catch fire. Always verify your material is safe for laser cutting and ensure proper ventilation in your workspace.
How do I make interlocking joints that fit tightly?
Account for kerf when designing tab and slot joints. Make slot width equal to material thickness plus half the kerf width. Test on scrap material first, measure the actual fit, then adjust your design or software offset settings accordingly.
Key Takeaways for Laser Cutting Design Success
Designing for laser cutting blends creativity with precision engineering. The most critical factors are using vector files, converting text to outlines, accounting for kerf, and organizing layers by function. Whether you use automated generators like Boxes.py, trace images in LightBurn, or craft intricate vector artwork in Illustrator, attention to detail determines your success.
Start with simple projects to build your workflow. Test often on scrap material. Iterate quickly because the laser rewards experimentation. With the right knowledge and workflow, you can go from idea to finished piece in minutes, designing boldly and cutting with confidence.