How to Make a Laser Gun: Safe DIY Tips
Building a functional laser gun may sound like science fiction, but high-power DIY builds using laser diodes, optics, and advanced cooling systems have made it technically possible. However, how to make a laser gun is not a simple weekend project. It involves Class 4 lasers capable of igniting fires, cutting metal, and causing permanent blindness in microseconds. This guide compiles real technical data from advanced builds to explain the components, configurations, and extreme risks involved. You’ll learn how multi-diode arrays generate 260 W beams, how invisible infrared lasers are aimed safely, and why water cooling and safety interlocks are not optional. Proceed with caution: most of these systems are illegal to operate outside controlled environments, and even reflections can blind.
Power Systems and Voltage Setup for High-Power Lasers
Most DIY laser guns start with 3.7 V lithium-ion batteries, but that is only enough for low-power pointers. To achieve burning or cutting capability, you need 24 to 34 V systems. One proven design uses four 3.2 V LiFePO4 cells in series, delivering 12.8 V, which is then boosted to 34 V using a 1500 W boost module. LiFePO4 cells are preferred over standard Li-ion due to their thermal stability and ability to deliver high current up to 15 A per cell without overheating.
Use High-Voltage Battery Packs
The power system forms the foundation of any laser gun build. Standard battery configurations include:
- Four LiFePO4 cells in series yielding 12.8 V
- 1500 W boost module stepping up to 34 V operating voltage
- Four-cell LiFePO4 charger for maintaining the battery pack
Each cell provides 3.2 V at 15 A, making this configuration ideal for sustained high-current delivery without thermal runaway.
Install Boost and PWM Control Modules
A boost module steps up voltage efficiently, but it must be paired with a PWM controller for safe operation. The PWM connects via the laser is yellow control wire and allows precise power adjustment from 0% to 100%. This is critical: at just 10% power, the beam can ignite a match instantly. At 50%, it cuts through wood. Full power should only be tested with remote triggers and full protective gear.
Wire for Maximum Conductivity
In high-current setups, even small resistance causes overheating. One build uses the laser housing as the positive terminal, reducing wire length and improving conductivity. Always use thick-gauge wiring, secure crimped connectors, and double-insulated circuits. Include an on/off switch and fuse in-line with the battery pack to prevent accidental discharge or short circuits.
Building Multi-Diode Laser Arrays for Maximum Output
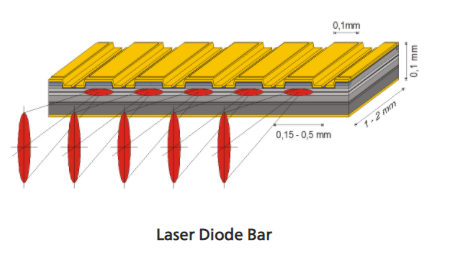
A single 20 W plus laser diode overheats and fails within seconds. Instead, advanced builds use 18 individual diodes, each producing 10 to 15 W, for a combined output of 260 W. These are split into two groups of nine, arranged to emit parallel beams that converge using optical components.
Combine Beams With a Cubic Prism
Each group of nine diodes emits into a separate beam path. Both beams are directed at a precision cubic prism, which merges them into a single, collimated output. Alignment is critical. Any angular deviation causes beam loss or internal prism damage. Use micrometer-adjustable mounts to fine-tune position before securing.
Ensure Wavelength Compatibility
Beam combining only works if all diodes emit the same wavelength, such as 950 nm IR. Mixing wavelengths leads to dispersion and power loss. Confirm diode specs before assembly and test each emitter individually with a laser power meter. This verification prevents wasted components and ensures optimal performance.
Optics and Focusing Mechanisms for Precise Beams

Manual focus is not precise enough for high-power beams. Use a gearbox motor with clockwise and counter-clockwise switches to adjust the lens position incrementally. This allows real-time tuning of beam convergence for maximum intensity at different distances.
Use Only Glass Lenses
Plastic lenses melt instantly under high-power operation. The final focusing element must be a glass lens rated for high thermal load. Some builds use a two-stage system: a magnifying glass for initial focus, followed by a high-zoom glass lens to tighten the beam further. This combination achieves the sharp focus required for burning applications.
Aim Invisible Beams Safely
Many high-power lasers operate at 950 nm, which is invisible to the human eye. To aim accurately, mount a 650 nm red laser at a 90-degree angle using a secondary prism. Align the visible red dot to run parallel to the IR beam path. The red dot shows where the invisible beam will strike. Alternatively, use an infrared camera to visualize the actual beam during testing. Never rely on guesswork with invisible wavelengths.
Active Cooling Solutions for Sustained Operation
High-power lasers generate extreme heat. Without cooling, operation is limited to 2 to 3 seconds before thermal shutdown or diode failure. A closed-loop water cooling system is essential for any serious build.
Prevent Overheating With Water Cooling
A complete water cooling setup requires several components working in sequence. Two 10 mm aluminum water blocks are CNC-machined and attached to the laser housing with thermal paste. Coolant flows through the blocks, then to a car heater radiator. A water pump circulates fluid, while a jet fan blows air across the radiator. An air-bubble chamber removes trapped gas to maintain flow efficiency.
Monitor Temperature in Real Time
Install a digital thermal sensor on the laser module to monitor temperature. Set up an alarm or automatic cutoff at 60 degrees Celsius. Even with cooling, limit firing to 5 to 10 second bursts with 30-second cooldown periods between shots. This duty cycle prevents thermal damage while allowing functional testing.
3D-Printed Housing Design for Portable Systems
/https://fbi.cults3d.com/uploaders/20226754/illustration-file/e8fa6b7b-99d0-45cf-8262-405461bdf457/ZGrab19.jpg)
The entire system mounts on a custom 3D-printed armature, often inspired by sci-fi designs like Iron Man is gauntlet. Parts are modeled in CAD software and printed using high-resolution printers like the Bamboo Lab X1 Carbon, which supports multi-color printing and automatic bed leveling.
Print Functional Components
Printed parts serve multiple structural and safety functions. The main housing provides mounting points for all electronics. Water block mounts secure cooling components. Wiring conduits organize electrical connections. Cooling tube guides direct fluid flow. Safety shield enclosures protect against stray reflections. Use heat-resistant filament such as ABS or PETG and ensure all mounting points are reinforced. Test fit each component before final assembly.
Safety Protocols and Protective Gear Requirements

Laser safety goggles are mandatory. No exceptions. Choose glasses rated for your laser is exact wavelength, such as OD6 plus for 950 nm. Some builders wear goggles under a welding helmet for double protection. Regular sunglasses or generic laser glasses offer zero protection against high-power beams.
Wear Wavelength-Specific Eye Protection
Selecting proper eye protection is the single most important safety decision you will make. Laser safety glasses must match your specific wavelength. OD6 plus rating provides adequate protection for 950 nm infrared applications. Verify certification labels before use. Replace damaged goggles immediately.
Block Stray Reflections
Even diffuse reflections from walls or tools cause eye damage. Use 3D-printed safety shields around the beam path and operate in a controlled, isolated area. Post warning signs and use interlocks that cut power if the enclosure is opened. Never assume a reflection is harmless.
Never Bypass Safety Interlocks
Commercial laser cutters house Class 4 lasers in Class 1 enclosures, safe only because interlocks disable the beam when opened. Tampering turns them into lethal devices. Always respect built-in safety systems. Removing interlocks for convenience is an invitation to catastrophic injury.
Legal and Ethical Considerations for Laser Builds
DIY laser guns are illegal in most areas. Possessing or operating a handheld laser weapon violates laws in many countries. In the U.S., lasers above 5 mW are restricted for pointing devices, and Class 4 lasers require registration and safety protocols. Fines, confiscation, or criminal charges result from misuse.
Formal Training Is Strongly Advised
For professionals, Laser Safety Officer certification is essential. Programs from Laser Safety Certification cover OSHA and ANSI compliance, emergency response, maintenance safety, and beam hazard analysis. Without training, you are not just risking injury. You are violating workplace safety standards.
Testing and Performance Limits of DIY Lasers
Always begin testing at low power, typically 10 to 20% using the PWM controller. Verify beam generation, alignment, and cooling function before attempting higher output. At 10%, the laser should ignite a match instantly, proving it is already dangerous.
Test Wood and Metal Cutting Safely
At 50% power, the beam cuts through wood and melts thin plastics. Full 100% power, reaching 260 W, is rarely tested due to extreme risk. One build demonstrated long-range burning at 500 m, but atmospheric distortion and beam divergence reduce effectiveness at distance. Record all results with IR cameras for future reference.
Key Takeaways for Building High-Power Lasers
Constructing a laser gun is not a beginner project. It demands expertise in high-voltage electronics, optics, thermal management, and laser physics. Every component, from the LiFePO4 battery pack to the cubic prism beam combiner, must be engineered for extreme performance and safety. If you proceed, do so in a professional lab, with full PPE, remote triggers, and no bystanders. Better yet, study laser technology through certified courses instead of replicating hazardous builds. The knowledge is valuable, but the risks of DIY laser guns far outweigh any experimental reward.
Frequently Asked Questions About Laser Gun Construction
Is it legal to build a laser gun at home?
In most jurisdictions, possessing or operating a handheld laser weapon violates local laws. The U.S. restricts lasers above 5 mW for pointing devices, and Class 4 lasers require registration and safety protocols. Check your local regulations before proceeding.
What power level is needed to burn objects with a laser?
Testing shows that just 10% power on a 260 W system can ignite a match instantly. At 50% power, the beam cuts through wood. This demonstrates the extreme hazard potential even at reduced settings.
Why do high-power lasers require water cooling?
High-power laser diodes generate enormous heat. Without active cooling, operation is limited to 2 to 3 seconds before thermal shutdown or permanent diode failure. Water cooling maintains operational temperatures for sustained use.
Can I use plastic lenses for focusing the laser beam?
No. Plastic lenses melt instantly under high-power operation. Only glass lenses rated for high thermal load are suitable for final focusing optics in burning laser applications.
How do I aim an invisible infrared laser accurately?
Mount a visible 650 nm red laser at a 90-degree angle using a secondary prism. Align the red dot parallel to the invisible IR beam path. Alternatively, use an infrared camera to visualize the actual beam is path during testing.
What safety equipment is absolutely required for laser gun builds?
Laser safety goggles rated for your specific wavelength are mandatory. Additional protection includes welding helmets, printed safety shields to block reflections, and IR cameras for visualizing invisible beams. Never operate without proper eye protection.