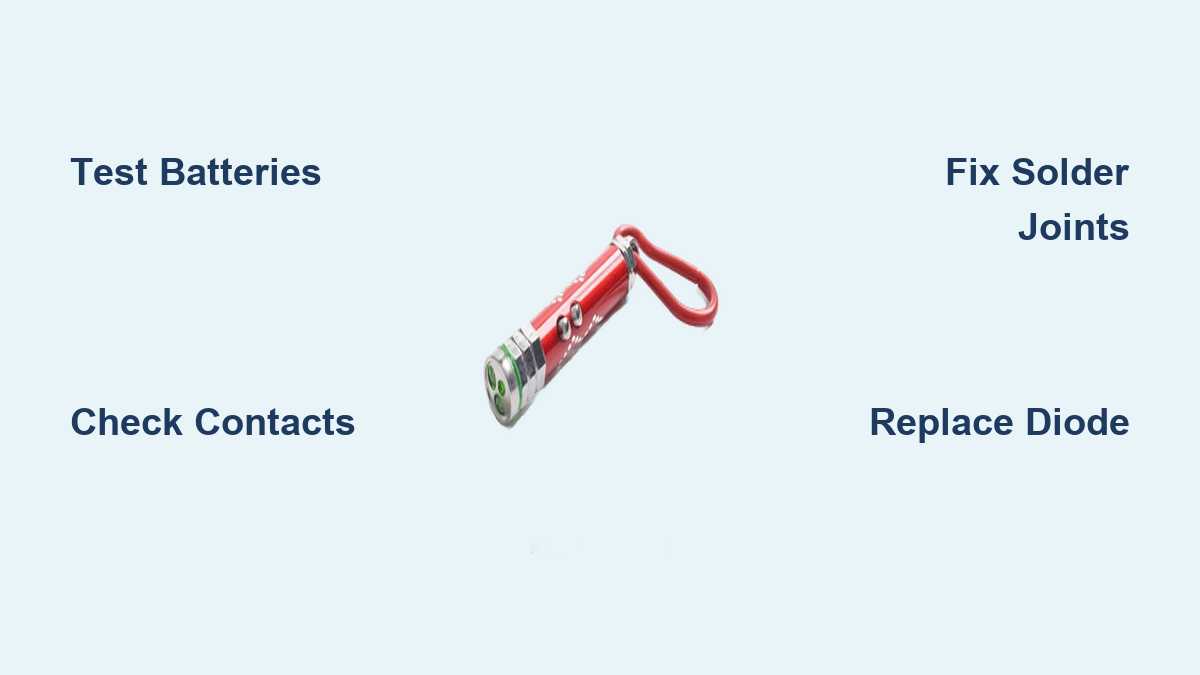
How to Fix a Broken Laser Pointer
A flickering beam, no light at all, or a laser that works only when twisted just right—these are the telltale signs of a failing laser pointer. If your device has stopped working, don’t toss it yet. How to fix a broken laser pointer is a common question, and the answer often lies in simple, fixable issues like dead batteries, loose connections, or worn switches. In fact, over 70% of laser pointer failures stem from power or electrical problems, not a dead diode.
With the right tools and a methodical approach, you can diagnose and repair most red and low-powered green laser pointers at home. This guide walks you through each step, from basic battery checks to replacing a laser diode, while highlighting critical safety risks, especially with green lasers that emit invisible infrared light.
Diagnose Power Supply First
Before opening the device, confirm the issue is not just weak or faulty batteries. This simple check saves time and prevents unnecessary disassembly.
Test Battery Voltage Correctly
Most laser pointers run on two 1.5V AAA or button-cell batteries, providing a total of 3V. Use a multimeter set to DC voltage.
Steps to test:
- Insert fresh alkaline batteries into the laser.
- Set your multimeter to DC voltage mode.
- Place the red probe on the metal body of the laser (positive contact).
- Touch the black probe to the spring end (negative terminal).
- A reading below 2.5V means insufficient power.
Low voltage usually means dead batteries, but corrosion or reversed polarity can also block current flow. Clean contacts with isopropyl alcohol if you see white or green residue.
Check for Corrosion and Contact Damage
Battery corrosion is a silent killer. It breaks electrical continuity and can permanently damage internal contacts.
What to look for:
• Green or crusty buildup on the spring
• White residue on battery terminals
• Discolored contact points
If the spring shows corrosion, clean it with a cotton swab dipped in 90%+ isopropyl alcohol. Use fine sandpaper or a small wire brush to gently scrub contact points. Let dry completely before reinserting batteries.
Pro Tip: Always insert batteries with the correct polarity. Reversed batteries will not power the laser and may damage the diode.
Open the Laser Safely
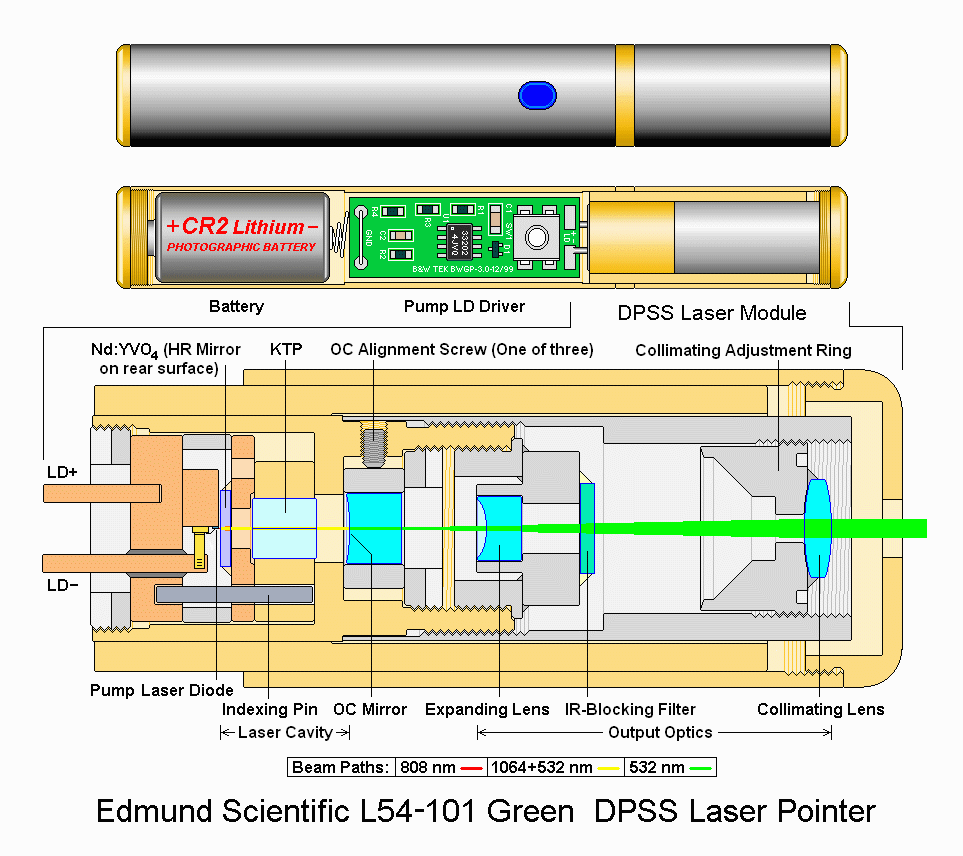
Forcing the casing open is the number one cause of irreversible damage during repair attempts. Take your time and use the right technique.
Prevent Switch Damage During Disassembly
The switch is fragile. Many users accidentally pop it out by pressing too hard on the button during opening.
Steps for safe disassembly:
- Tape the switch in place before opening.
- Apply gentle pressure to the side seam of the casing.
- Twist or slide the halves apart. Do not pry from the center.
- Some models unscrew, while others snap open.
Warning: If the casing is glued or ultrasonically welded, opening it may destroy the housing. Proceed only if replacement is not a concern.
Inspect and Repair Internal Components

Once open, examine each part for visible damage. Systematic inspection reveals the root cause in most failures.
Fix Dry or Cracked Solder Joints
Over time, vibration and heat can crack solder connections, especially on the laser diode and switch leads.
What to look for:
• Dull, cracked, or lifted joints
• Discolored solder around component leads
• Joints that appear lifted from the circuit board
Use a 15-30W soldering iron with rosin-core solder. Reheat each joint until the solder flows smoothly. Avoid overheating. Keep contact under three seconds per joint.
Cold or dry joints cause intermittent operation. Resoldering often restores full function.
Restore Spring Contact Function
A bent or weak spring prevents consistent power delivery.
Inspection checklist:
• Is the spring compressed or kinked?
• Does it show signs of corrosion?
• Does it bounce back when pressed?
Use needle-nose pliers to gently reshape and extend the spring. Clean with alcohol and ensure it makes firm contact with the battery.
Visual Cue: If the spring does not bounce back when pressed, it has lost tension and should be replaced.
Test and Clean the Switch
The switch is a frequent failure point in laser pointers. Testing takes seconds and rules out this common issue.
Use a Multimeter to Test Continuity
- Set your multimeter to continuity mode (beep setting).
- Place one probe on the spring contact.
- Touch the other probe to the switch terminal.
- Press the button. You should hear a beep.
No beep means the switch is not making contact.
Clean or Replace the Switch
If the switch fails continuity testing:
• Spray electronic contact cleaner into the switch mechanism.
• Work the button back and forth to dislodge debris.
• If still unresponsive, desolder and replace it with a matching micro switch.
Expert Note: Oxidation on switch contacts mimics a dead laser. Cleaning often solves the issue without replacement.
Replace the Laser Diode
If power and connections are good but there is no beam, the diode is likely dead. This is the final electrical component to check.
Choose the Right Replacement Diode
Match your original diode specifications exactly.
• Red lasers: Use a 650nm, 3V diode. These are common and inexpensive.
• Green lasers: Often require entire module replacement due to internal optics.
• Match voltage and size to your original unit.
Caution: Never touch the diode lens. Skin oils reduce output and can cause overheating.
Desolder and Install the New Diode
- Note the positive and negative leads before removal.
- Heat both solder joints and lift the old diode with tweezers.
- Insert the new diode. Align it straight in the housing.
- Solder quickly to avoid heat damage.
Pro Tip: Use a heat sink clip on the leads during soldering to protect the diode from thermal damage.
Reassemble and Test
One wrong step during reassembly can undo your repair. Take care with each component placement.
Follow Proper Reassembly Steps
- Place the foam spacer (if present) in the battery compartment.
- Ensure the spring sits flush and aligned.
- Slide the casing halves together smoothly.
- Avoid twisting or forcing. Misalignment can crush internal parts.
Final Function Test
Insert fresh batteries and press the switch. Look for a steady, bright beam. Test multiple times to confirm consistency.
Success Signal: A continuous beam without flickering means the repair worked.
Green Laser Repair: Proceed with Caution
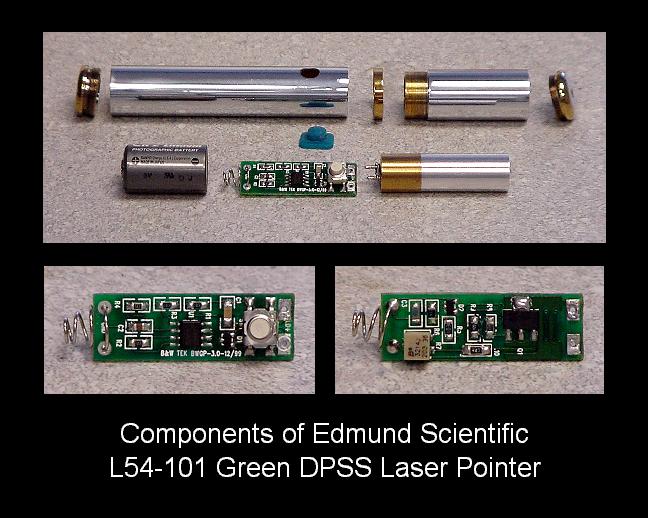
Green lasers are not simple diodes. They are complex optical systems that require special handling.
Understand the Internal Components
Green light is created through a multi-stage process:
- 808nm IR diode emits invisible infrared light.
- Nd:YVO4 crystal converts it to 1064nm.
- KTP crystal doubles frequency to 532nm (visible green).
- Lens system focuses the beam.
Any misalignment breaks the chain and prevents green light output.
Recognize When Realignment Is Impossible
If you hear rattling or see loose internal parts, the optics are dislodged.
• Front housing snapped? Realignment is nearly impossible.
• Crystals shifted? Requires precision jigs and laser alignment tools.
• Thermal adhesive degraded? Components drift over time.
User Case: One technician reported that after forced disassembly, parts A (lens housing), B (expanding lens), and C (crystal mount) became loose. Reassembly failed due to micron-level alignment needs.
Never Operate an Open Green Laser
This is not a warning. It is a safety imperative that must be taken seriously.
Invisible IR Radiation Is Dangerous
If the KTP crystal is misaligned or missing, the IR diode still emits 808nm or 1064nm light—invisible but powerful enough to burn retinas instantly.
• Never power an open green laser module.
• Always wear IR-rated laser safety goggles when testing.
• Assume any uncollimated beam contains hazardous infrared radiation.
Expert Warning: “You will not see it coming. IR exposure can cause permanent eye damage before you blink.” — lazeerer, laser technician
Use Thermal Adhesive, Not Super Glue
When reattaching optical components, avoid common mistakes.
• Super glue (cyanoacrylate) clouds lenses and fails under heat.
• Thermal conductive adhesive maintains alignment and dissipates heat.
• Apply adhesive sparingly. Too much can seep into optical paths.
When to Give Up and Replace
Some lasers are not worth fixing, especially if safety is compromised.
Repair Is Not Recommended If
• Front lens housing is cracked or broken
• Internal crystals are loose or missing
• You lack soldering skills, multimeter, or safety goggles
• The laser was forcibly opened and parts fell out
Expert Opinion: “After the way you took it apart, I do not think it is fixable. Realignment without proper tools and eye protection is a no-go.” — lazeerer
Buy a New One: Smart and Safe
Replacement is often cheaper and safer than repair.
Recommended models:
• NewWish Green Laser Pen: Affordable, reliable, widely available
• Lazerer.com models: Higher build quality, consistent output
• Amazon or eBay: Read reviews for durability and accuracy
Buying tips:
• Match the original mW rating (for example, 5mW, 50mW)
• Avoid overpowered lasers (>5mW) unless legally permitted
• Choose metal-bodied pointers. They last longer.
Final Advice: “Just forget about this laser and buy another one. It is a loss.” — lazeerer
Frequently Asked Questions About Fixing a Broken Laser Pointer
Why did my laser pointer stop working suddenly?
The most common causes are dead batteries, corroded contacts, or a faulty switch. These are all easy to check and fix before opening the device.
Can I fix a green laser pointer myself?
Green lasers are complex optical systems. If the internal crystals become misaligned, professional realignment tools are required. Attempting repair without proper equipment and safety goggles is dangerous.
How do I know if the laser diode is dead?
If batteries are fresh, contacts are clean, and the switch works, but there is no beam, the diode is likely dead. You can confirm with a multimeter by testing for voltage at the diode leads.
Is it safe to open a laser pointer?
Red laser pointers are generally safe to open. Green lasers are dangerous when open because the infrared diode continues operating even when the frequency-doubling crystal is misaligned, emitting invisible harmful radiation.
What tools do I need to fix a laser pointer?
Basic tools include a multimeter, soldering iron (15-30W), isopropyl alcohol, fine sandpaper, needle-nose pliers, and tweezers. For green lasers, you also need IR-rated safety goggles.
When should I just replace my laser pointer instead of repairing it?
Replace the unit if the housing is cracked, internal optics are loose or missing, or you lack the necessary tools and skills. Often, replacement is safer and more cost-effective than repair.
Key Takeaways for Fixing Your Laser Pointer
Most red laser pointer failures can be traced to simple electrical issues: dead batteries, corroded contacts, dry solder joints, or a faulty switch. These problems are easily diagnosed with a multimeter and fixed with basic tools. Always start with battery and contact inspection before attempting more invasive repairs.
Green lasers require extra caution. Their complex internal optics (IR diode, Nd:YVO4 crystal, and KTP crystal) can emit invisible but dangerous infrared radiation if powered while disassembled. Never operate an open green laser without proper IR safety goggles.
Know when to walk away. If internal crystals are loose, the housing is cracked, or realignment is required, replacement is the safer and often cheaper option. With the right approach, many broken laser pointers can be restored to full function, but safety must always come first.